Trouble Shooting
Taking the hatching egg quality as given, an embryo needs five things to grow satisfactorily and to develop into a healthy chick:
- Correct incubation temperature.
- Adequate supply of oxygen and removal of CO2.
- Loss of a certain amount of water as moisture vapour.
- Regular turning.
- A hygienic environment.
If you have a problem with hatchability or chick quality, check these to find out if it is caused by the hatchery. Detailed information about the conditions 1–5 are provided by the previous chapters.
When trying to solve a hatchability problem always be aware that it can be also related to egg handling, egg transport or the breeder flock itself. With regard to quality, the performance of the chicks and the mortality during the first week is additionally influenced by the chick handling procedures, vaccination, transport and the brooding conditions on the farm. Therefore good communication between the different parts of the production chain is essential to locate and solve any occurring problem.
The exchange of information between the breeder flock manager and the hatchery manager is especially important for the success of a parent stock operation.
Breakout analysis
Breakout analyses are useful hatchery management procedures that provide valuable information by helping to relate problems to the breeder flock, the egg handling procedures or the hatchery.
There are three procedures for breakout analysis which can be implemented by a quality control person. Each of the methods has advantages and disadvantages when compared to other methods. The data should be used to continuously control the production procedures and find room for improvement. If a database has been built up, it can be used for a quick and precise troubleshooting if problems occur.
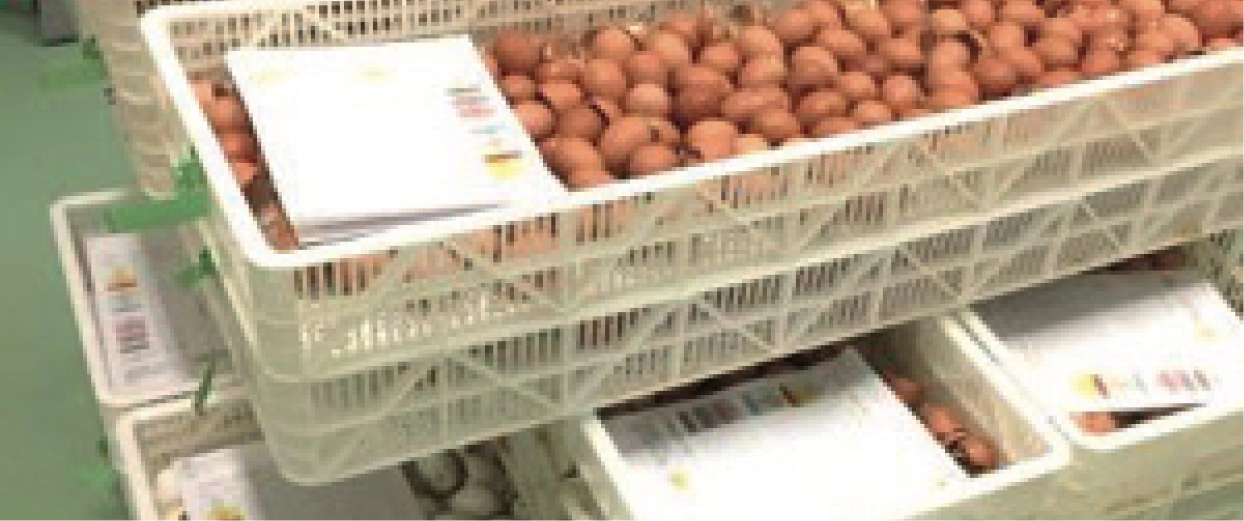
The quickest way to estimate the fertility in a breeder flock is a fresh egg breakout.
The eggs can be opened just after lay or after arrival at the hatchery. The disadvantages of this breakout method are the loss of valuable hatching eggs, possible errors of prediction because of the relatively small sample size (usually 100 eggs per flock) and the one-dimensional information (fertile or not fertile). It is therefore recommended to limit the use of a fresh egg breakout to situations where a short-term fertility check is required:
- Planning the first setting of eggs from a young flock.
- Problem flocks.
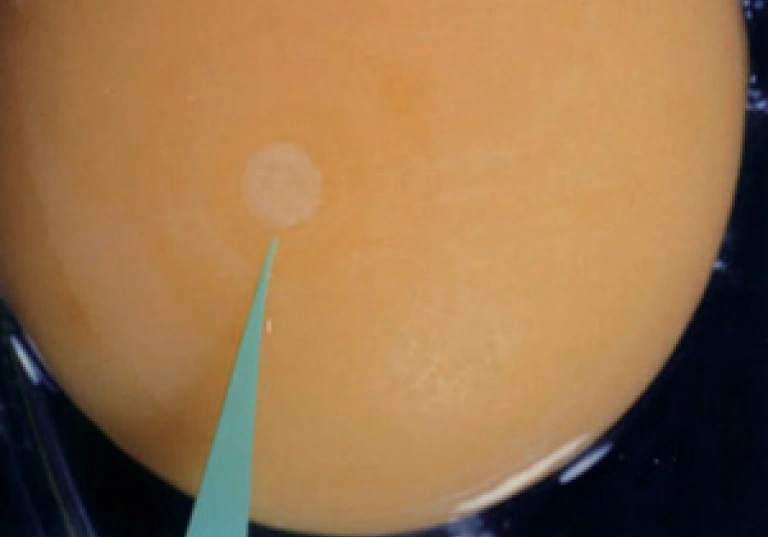
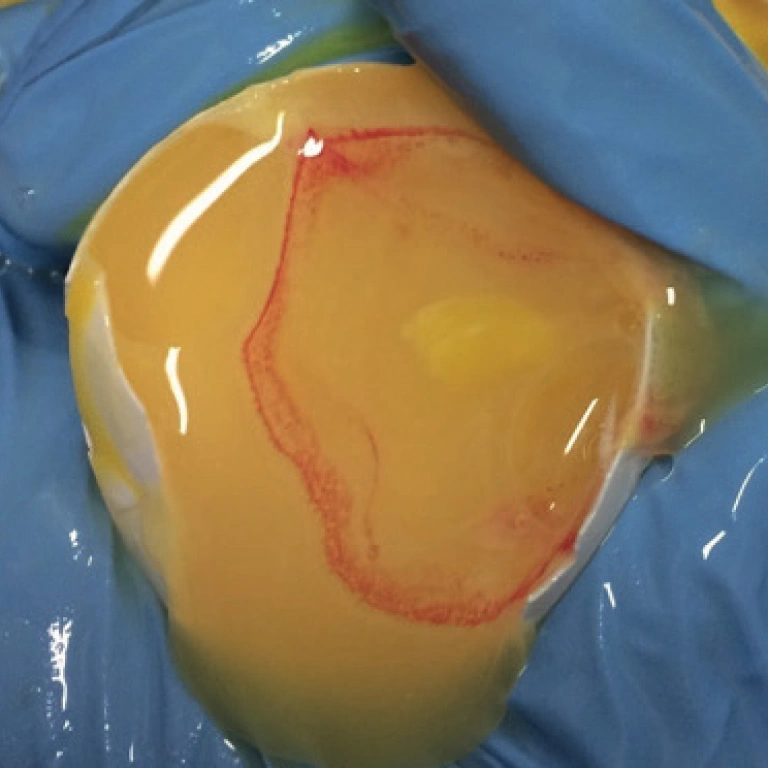
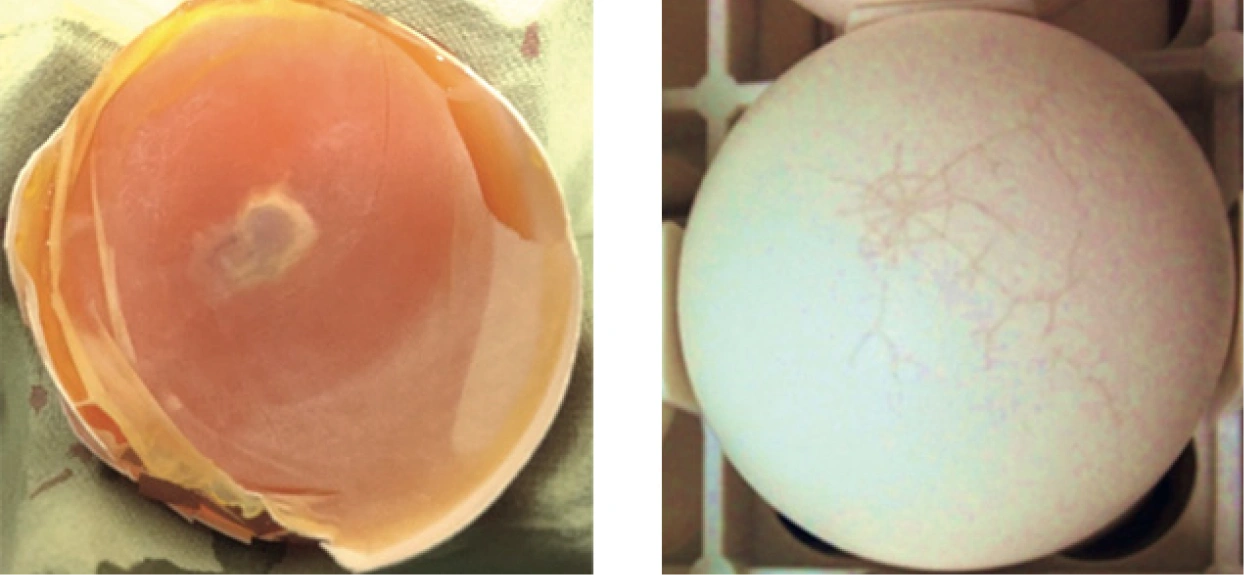
A fertile egg
A fertile egg
- Blastoderm (embryo) always round
- Doughnut shape
- White symmetrical ring with clear centre
- Sometimes white dot present in centre
- Larger than blastodisc
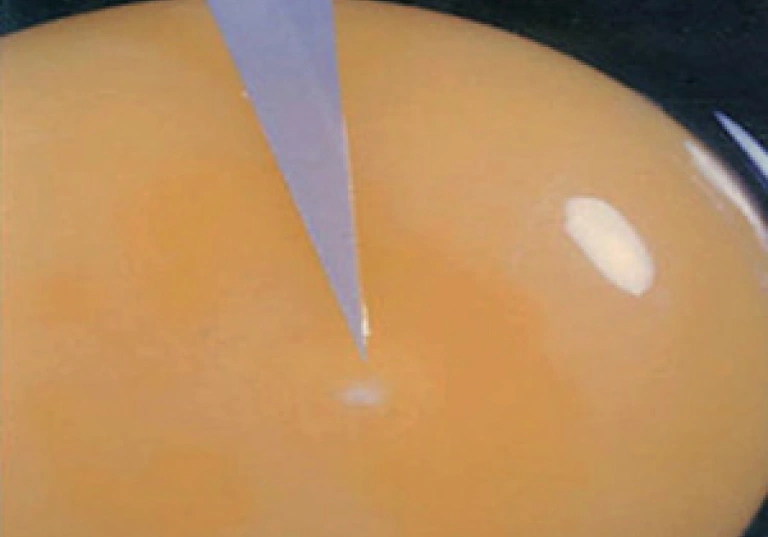
A true infertile egg
A true infertile egg
- Blastodisc (unfertilised oocyte) rarely perfectly round
- Jagged edges
- Usually more vacuoles (bubbles)
- Small intense white spot, sometimes granulated
The candling breakout analysis offers the most accuracy in determining fertility.
It is also useful in recording other sources of breeder flock or egg handling failures, such as early deads, cracked eggs or eggs set upside down. It is therefore a recommended tool to monitor the week-toweek status of the breeders. Additionally the candling percentage allows a quite precise prediction of the expected hatch of saleable chicks.
As the candling is usually done at day 9–10 there is time to react (rearrange settings, shipments …, search for and solve causes) if a high number of clear eggs is noticed. The sample size should be 4 to 6 trays (at least 600 eggs) from different location inside of one setter.
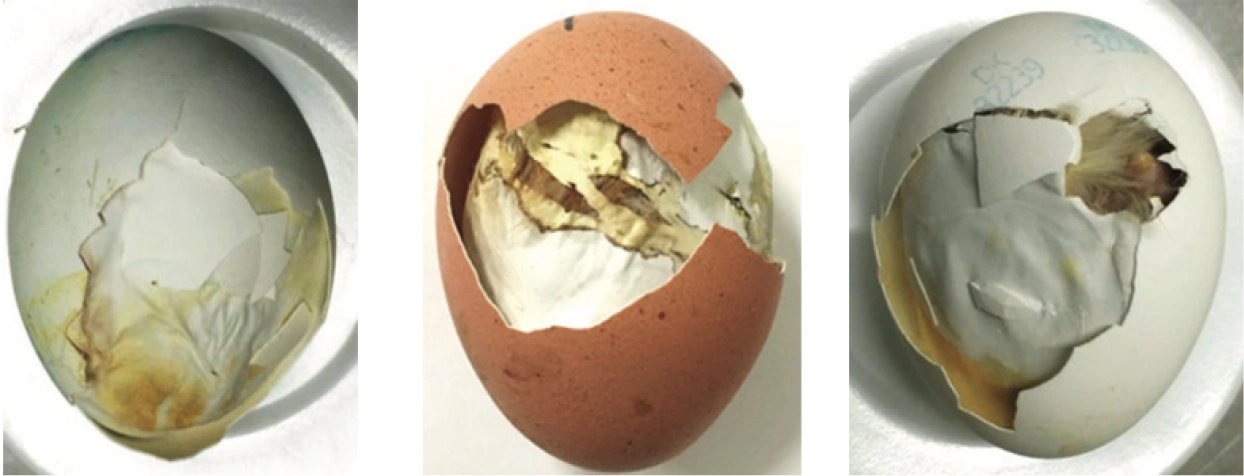
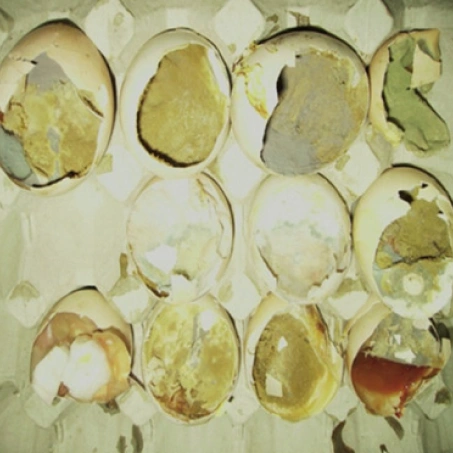
Most often performed in hatcheries is the breakout on hatch days also called hatch debris breakout. It gives a full picture about the pattern of embryo mortality, but infertiles and early deads are difficult to distinguish and there is a time delay of usually 4 weeks (3 weeks incubation + 1 week storage) between the date of lay and the breakout. To proceed take 4 to 6 hatcher baskets of one flock from different position out of one hatcher. Remove all unhatched eggs and place them on pulp trays.
Record the number of cull and dead chicks left in the baskets. As already mentioned, the differentiation between infertile eggs and very early deads is difficult, because the blastodisc can often not be found. Therefore one needs to judge the appearance of the yolk and the albumen. If at hatch day the egg looks still like a “table egg” it was most probably infertile. If you deal with a very early dead the yolk colour will slightly change and the albumen will be thinner.
The content of eggs containing embryos that died during the second week of incubation will often appear black, because of the breakdown of blood. Be careful not to classify these eggs as contaminated as long as they do not emit an odour.
The breakout data should be analysed by using standards based on the results of the individual hatchery. From time to time the standards should be compared to results achieved in other hatcheries. If you notice elevated percentages in single categories have a look at the appendix where you will find a comprehensive listing of the probable causes.
Necropsy and breakouts analysis
Performing a breakouts Analysis
The necropsy is one good way for monitoring the quality of all processed flocks because in the necropsy results it can be seen the real performance and it can be appreciated if performance conditions are in line with the genetic potential of our eggs. The hatcheries can „transform” the eggs into qualitative chicks if all influencing factor are under control, but it cannot improve the genetic value. By contrary, it can destroy or it can damage the chicks’ quality.
Carrying out a correct necropsy is very important for our process, in order to make sure that our hatchery trait well the genetic value. For this action is needed a sufficient number of eggs to be tested and the sample should be representative for the number off eggs processed for every flock.
For this analysis hatcheries need to use a dedicated table which is easy to clean, comfortable for the operator, and which can manage the breakouts debris with maximum biosecurity.
Infertility in clear eggs with no embryonic development
- Males undernourished: follow a recommended feeding programme for adequate nutrition; replace underweight males.
- Too few males: increase the number of males in the flock; in artificial insemination increase the frequency.
- Seasonal decline of fertility: use young cockerels which are more resistant to environmental stress.
- Competition among breeding males: do not use many males; rear all males together; place temporary partitions in large pens.
- Diseased flock: conduct an approved disease control program.
- Frozen combs and wattles: provide comfortable housing; properly select and maintain drinking fountains.
- Old males: replace with younger males. Male sterility: replace males in pen/house.
- Selected mating in pens: artificially inseminate infertile hens; replace males in the pen/house.
- Crowded breeds: provide the recommended floor space; follow recommendations of H&N International.
- Improper artificial insemination techniques or use of old/over-diluted semen: follow recommendations of H&N International.
Very early dead blastoderm

(phase – 72 hours)
- See all possible causes and remedies from Infertility in clear eggs with no embryonic development
- Eggs stored for too long or incorrectly: stored eggs at the wrong temperature (too cold or too warm) or at an instable temperature and humidity; incorrect or failures in S.P.I.D.E.S. process; long interval from one S.P.I.D.E.S. process to another.
- Shaker eggs and trouble in handling and transport: pay attention to gentle handling.
- Improper disinfections: follow disinfection recommendations – pay attention to dosage and time.
- Eggs damaged by environment: collect eggs frequently following specific criteria.
- Eggs of the day: incubate fresh eggs; increase blastoderm mortality; instable pH is bad for incubation; a minimum of 48 hours is necessary to stabilise pH and eggs conditions.
Early dead blood ring
- Improper storage: follow egg storage recommendations.
- Improper incubation temperatures: check calibration and accuracy of incubator set-point; follow recommended temperature settings. Improper flocks nutrition: use a feeding formula with a balanced nutrient levels. Improper disinfections: follow disinfection recommendations – pay attention to dosage and time.
- Bacteria contamination: handle eggs gently and check eggshell quality; check cleanness of nests and conditions of the farm floor; make sure the operator has clean hands; check the distribution of new males; look out for floor and dirty eggs; be careful of improper or accidental “showers” of eggs; look out for the “sweating” of old eggs in storage; be careful to new males replacing; pay attention to Aspergillus or mycosis contamination; control and improve disinfection processes; monitor the eggs in transport.
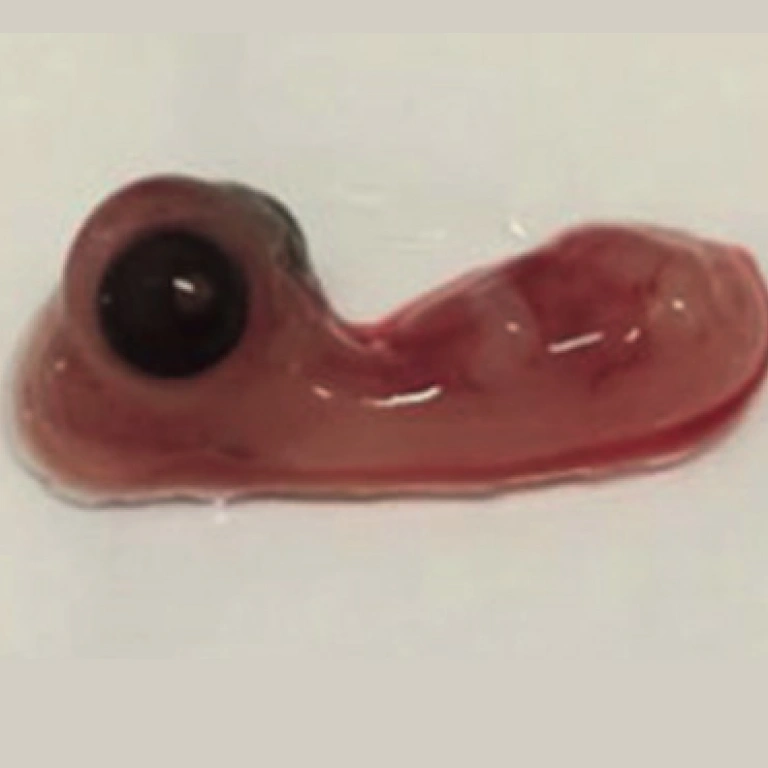
Medium dead mortality
(7–12 days)
- Improper incubation temperature: follow recommended incubation settings, not too warm and not too cold.
- Improper eggs turning: control turning functions for eggs. This is especially important in the first 12 days of incubation.
- Improper ventilation: increase ventilation and control carbon dioxide (CO2) value; if hatchery location is high above sea level, add oxygen.
- Inherited low hatchability, poultry disease: check genetic potential; test flocks for diseases and use adequate veterinary treatments; monitor health; investigate if flocks are under veterinary actions.
- Improper flocks’ nutrition: use a feeding formula with a balanced nutrient level.
- Micro cracks and bacteria contamination: see previous.
Setter later mortality
(13–16 days)
See all possible causes and remedies from Medium dead mortality, 7–12 days.

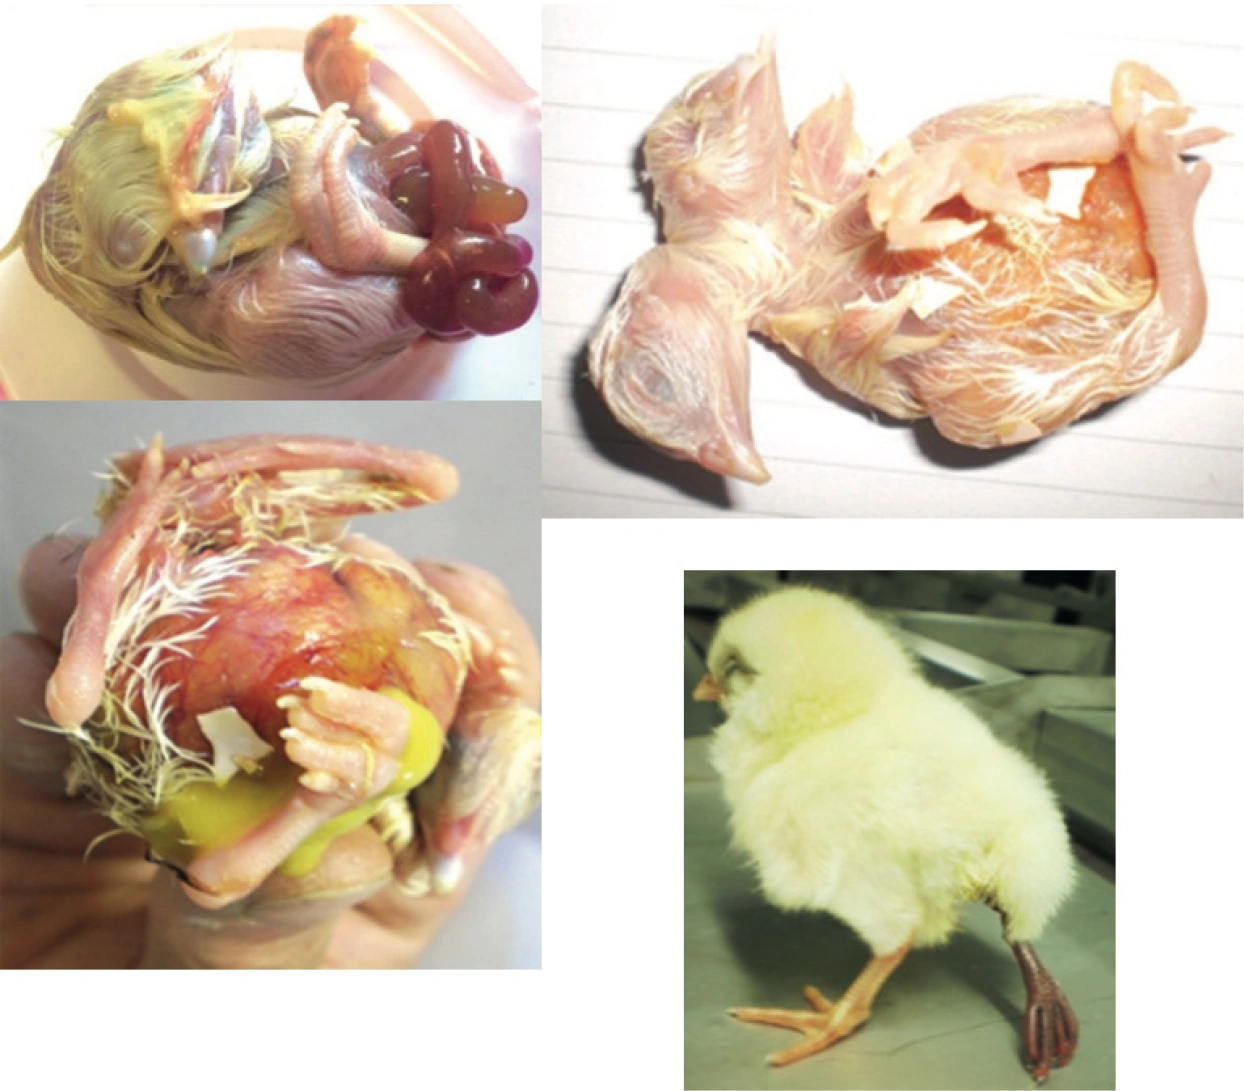
General malformations
- Improper incubation temperature: follow recommended incubation settings, not too warm and not too cold.
- Extreme low humidity in process: control the average of egg weight loss; control if humidifier works.
- Improper eggs turning: control turning functions for eggs. This is extremely important in the first 12 days of the process.
- Improper ventilation: increase ventilation and control carbon dioxide (CO2) value; if hatchery location is high above sea level, add oxygen.
- Farm health, poultry disease: check genetic heredity consanguinity; test flocks for diseases and use adequate veterinary treatments; monitor health; investigate if flocks are under veterinary actions.
- Improper transport and management: pay attention to gentle transport and handling, avoid eggs shaking.
- Improper flocks’ nutrition: use a feeding formula with a balanced nutrient level.
Please note:
Some specific malformations have a direct relation to certain incubation conditions. Please verify data for results and interpretations.
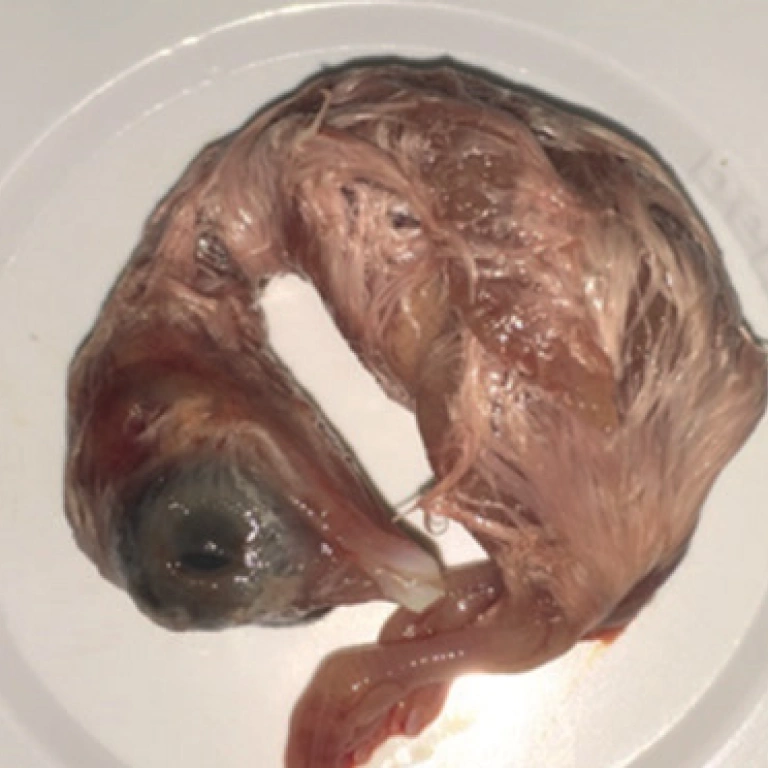
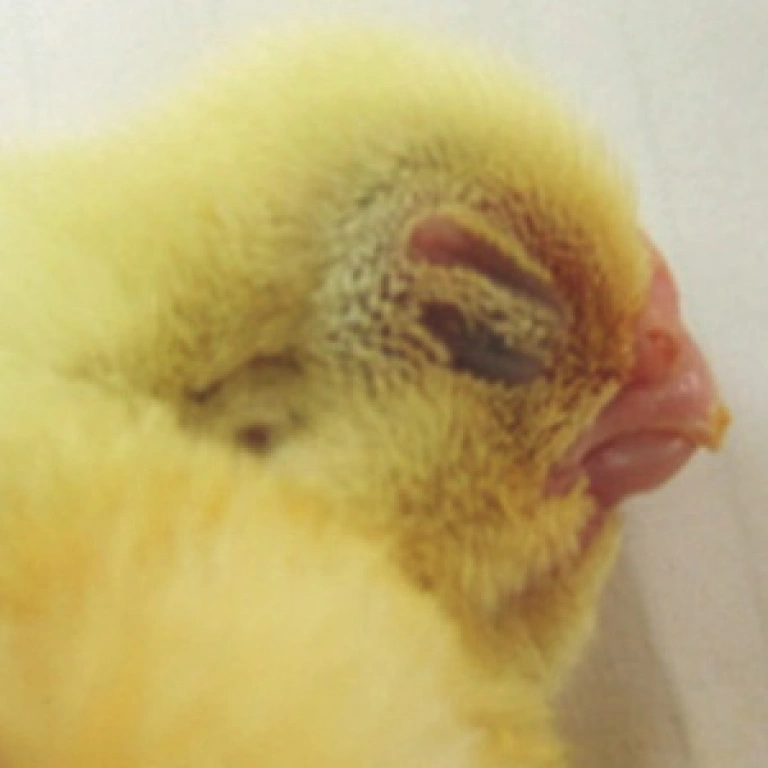
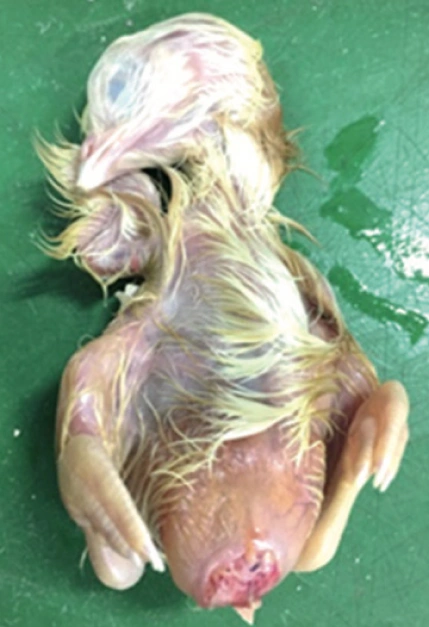
Malformed beak
- Cross beak: incubation temperature too high in the first 11 days.
- Parrot beak: extremely high concentration of disinfectant or too long exposure; intoxication with chemical agents.
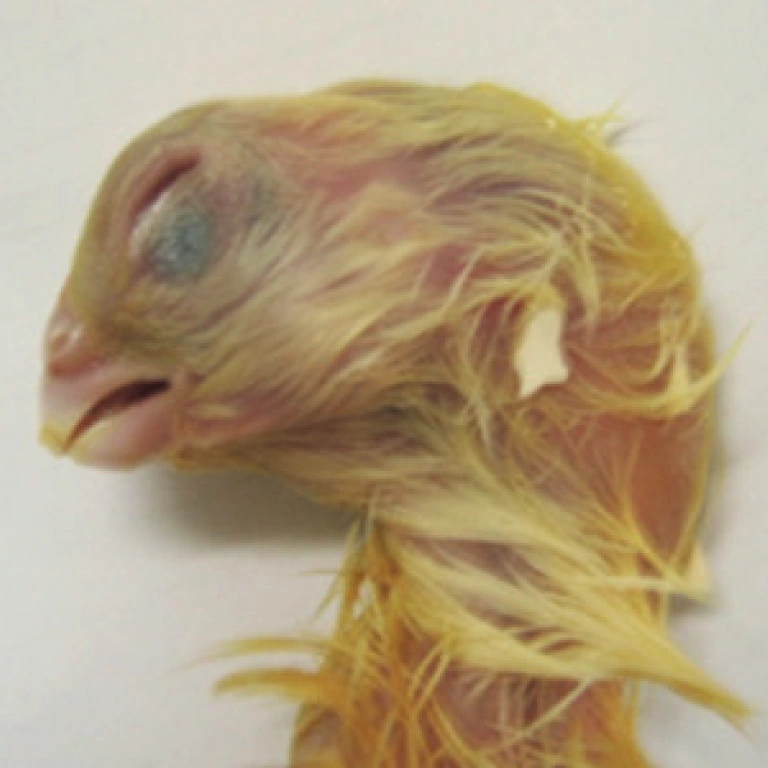
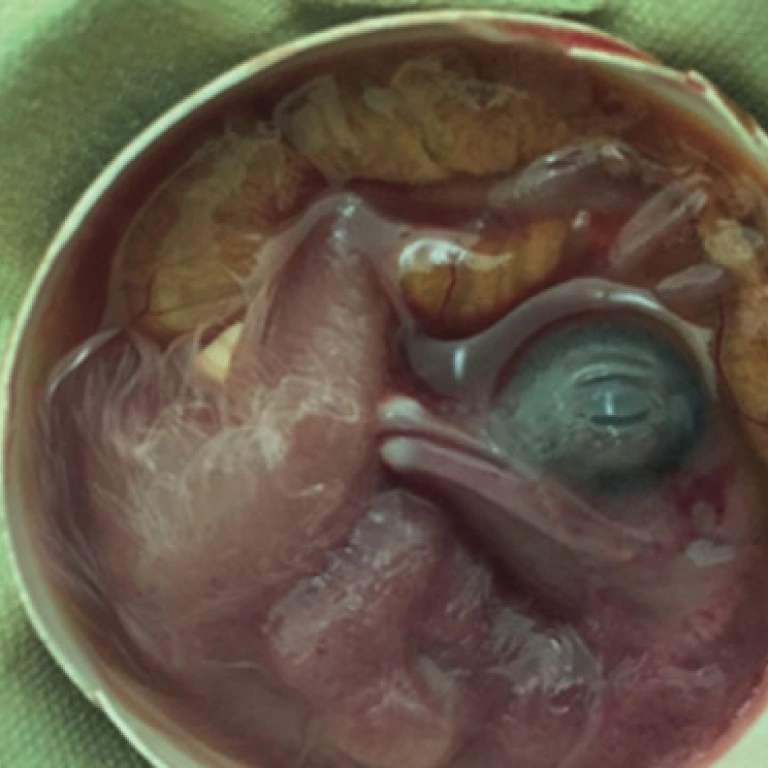
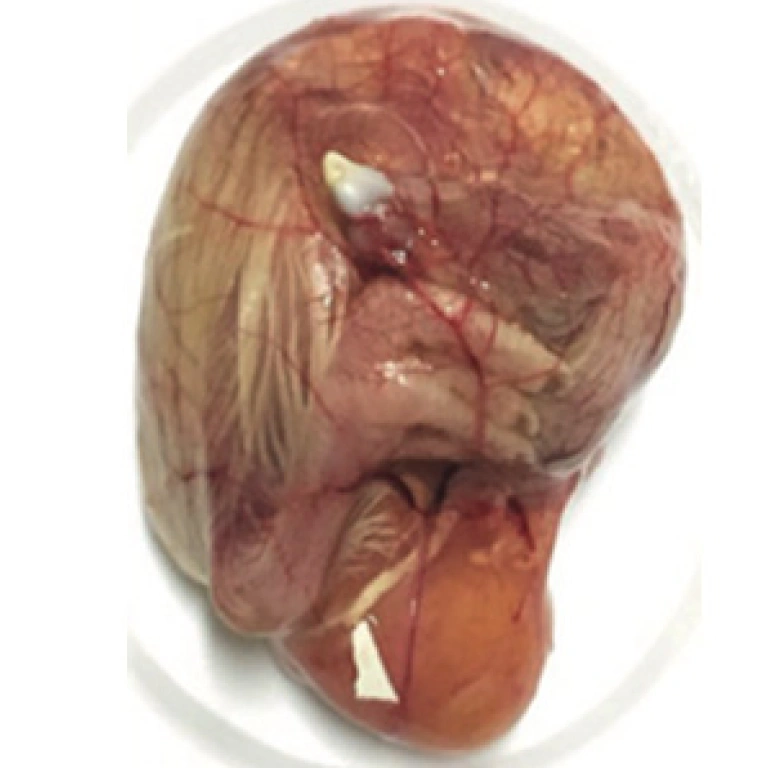
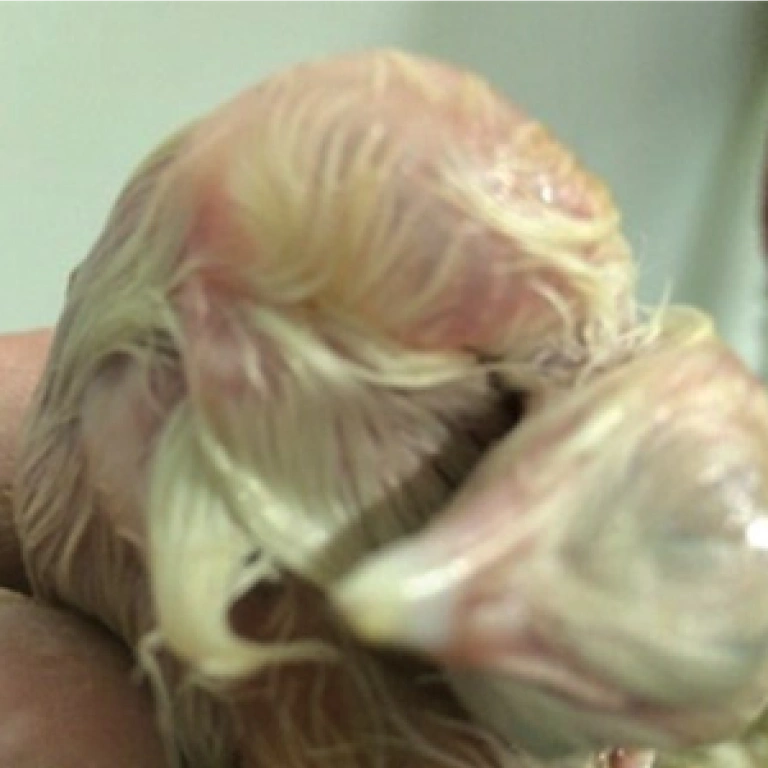
Malformed brain exposed
- Brain exposed: high temperature in the first 9 days of incubation
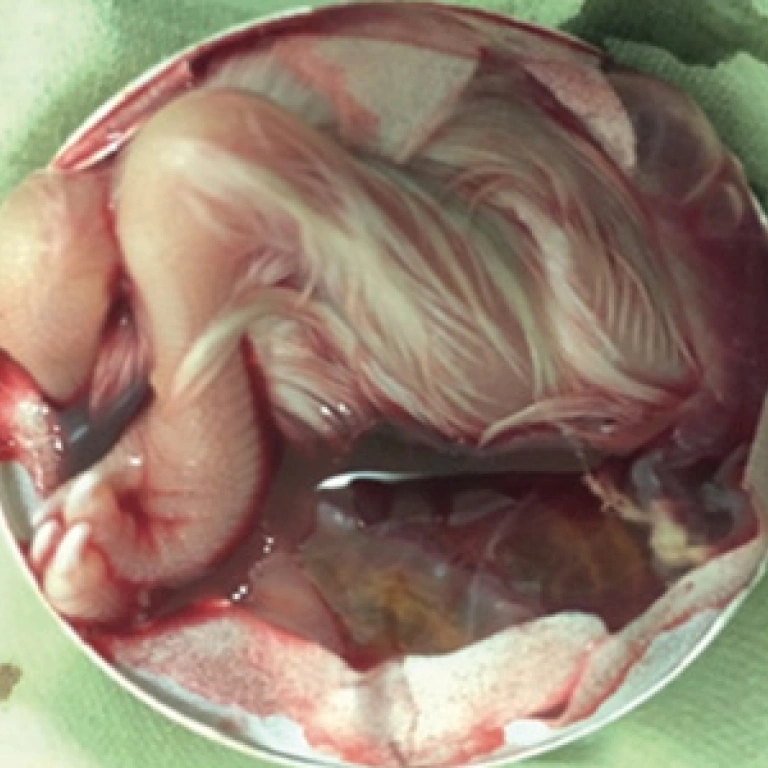
Malposition of air cell
- General malposition; head in middle of legs; head on left side: turning failures; errors in turning angle; too high or too low incubation temperature; incorrect humidity; shaking during eggs handling; shocks in turning.
- Lateral air cells: possible problems related to turning or wrong angle; transport of eggs blunt-up; wrong positioning in trays; inadequate trays (too much space for small eggs).
- Horizontal position of embryos, with big air cells: excessive egg weight loss; micro cracks; turning failure.
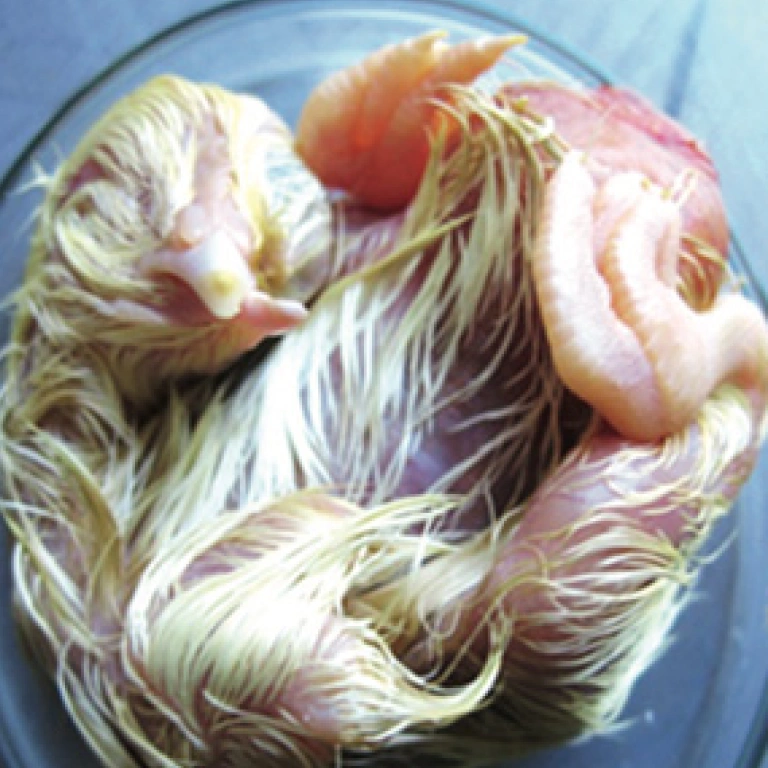
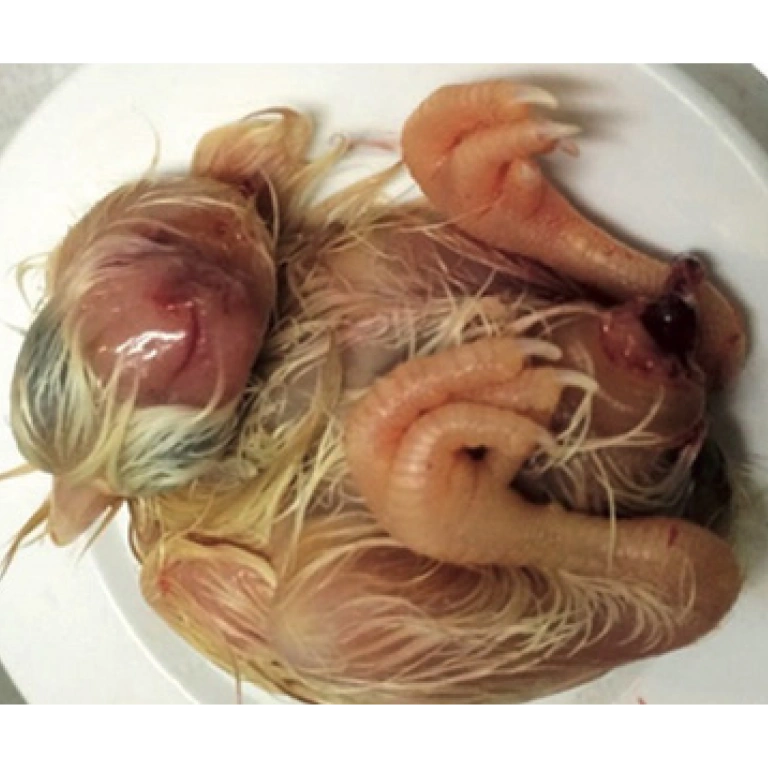
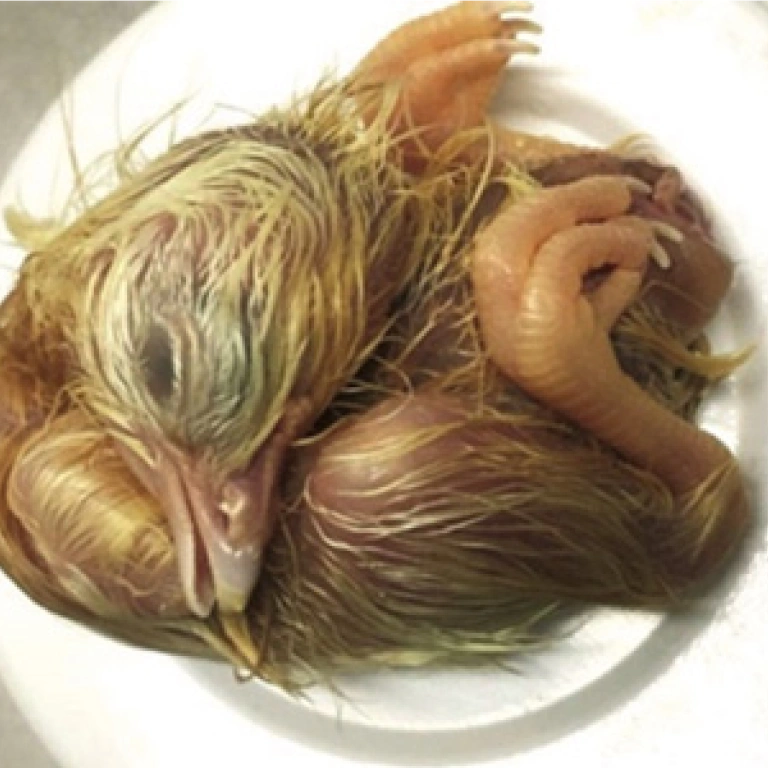
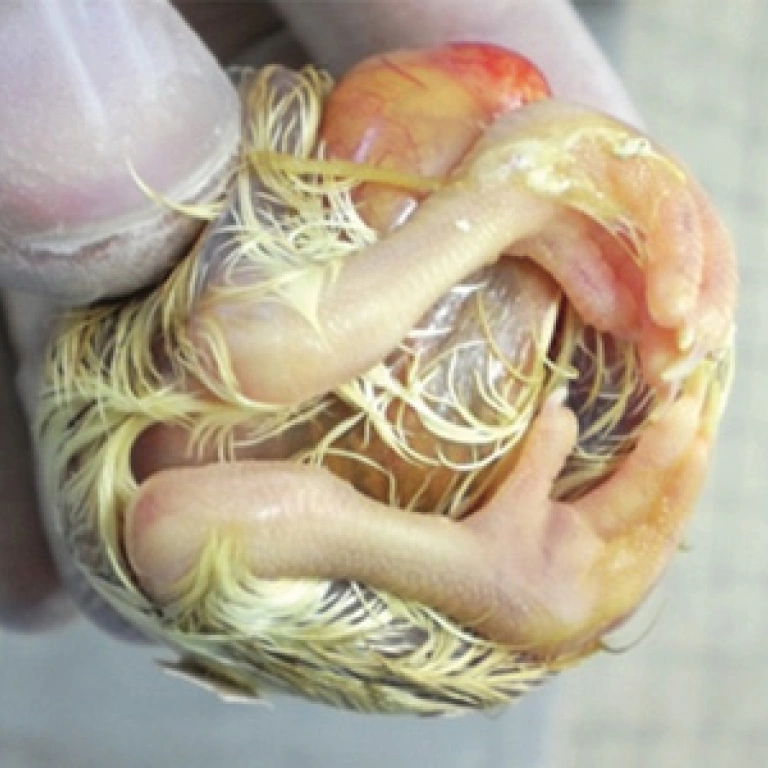
- Feet on head: low level of amniotic liquid; control egg weight loss, eggs percentage composition (yolk/albumen%) and the level of vitamins support in feeding.
Malposition
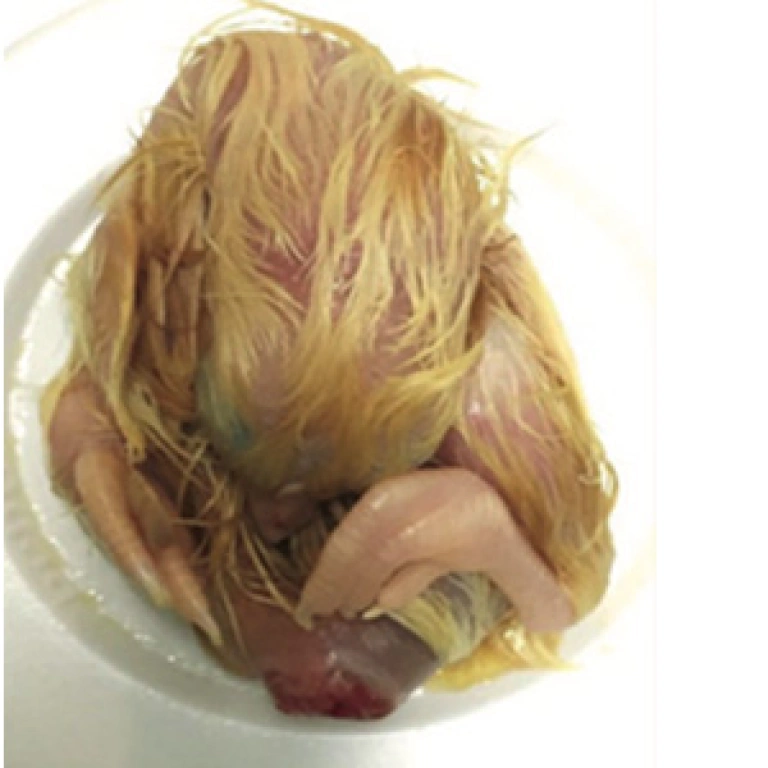
- Wings under head
- Head over wings: control turning; control the symmetry of the angle in eggs turning if right/ left is the same; inadequate trays (too much space for small eggs).
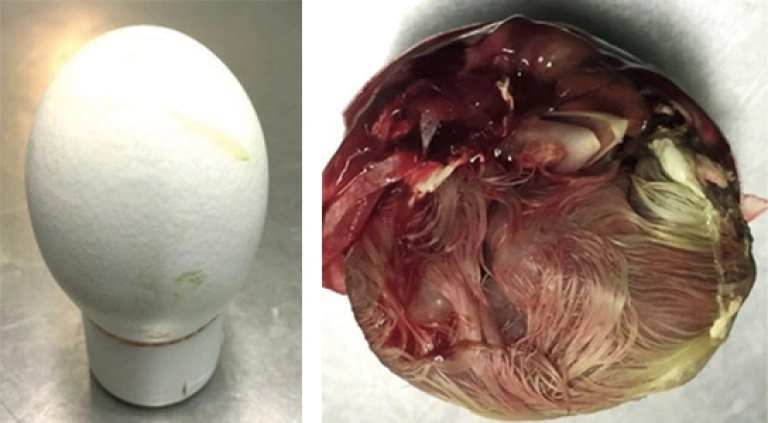
Upside-down eggs
- Upside-down chick’s position: wrong positioning at eggs collection; transport of eggs blunt-up.
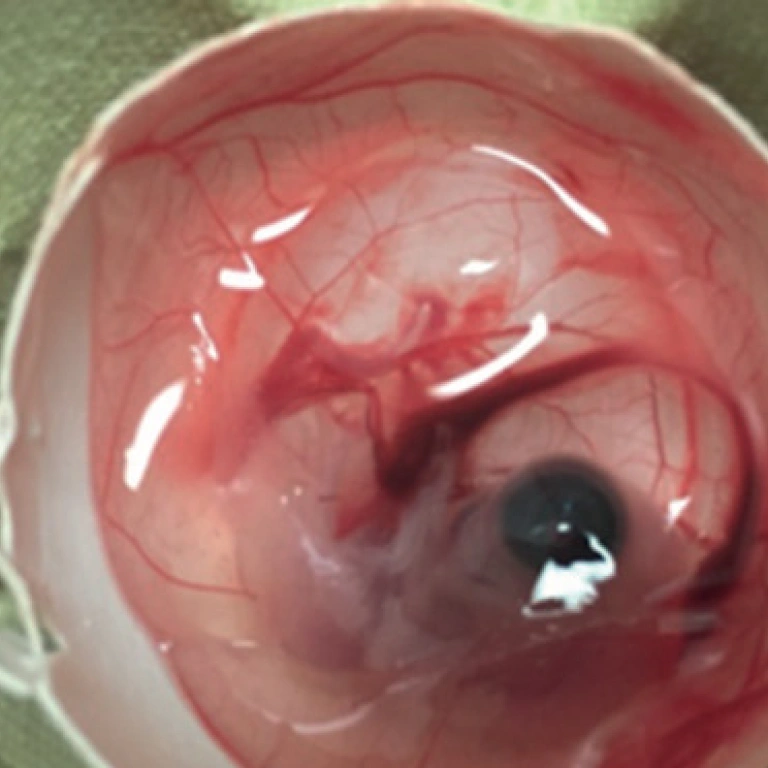
Dead at transfert time
(17–18.5 days)
- Improper incubation temperature: follow recommended incubation settings, not too warm and not too cold.
- Improper eggs turning: control the turning function and measure the angles.
- Improper ventilation: increase ventilation and control carbon dioxide (CO2) value; if hatchery location is high above sea level, add oxygen.
- Inherited low hatchability, poultry disease: check genetic potential; test flocks for diseases and use adequate veterinary treatments; monitor health; investigate if flocks are under veterinary actions.
- Improper humidity value: too low or too high humidity.
- Transfer anomaly: verify if the transfer is done at right time and in a warm room, warm basket or warm hatcher machine which is switched on; avoid thermic shock and inopportune “shower of eggs”.
- Disinfection in hatcher after transfer: some hatcheries use disinfectants in hatchers after transfer. Always control product and relative dosage.
- Improper flocks’ nutrition: use a feeding formula with a balanced nutrient level.
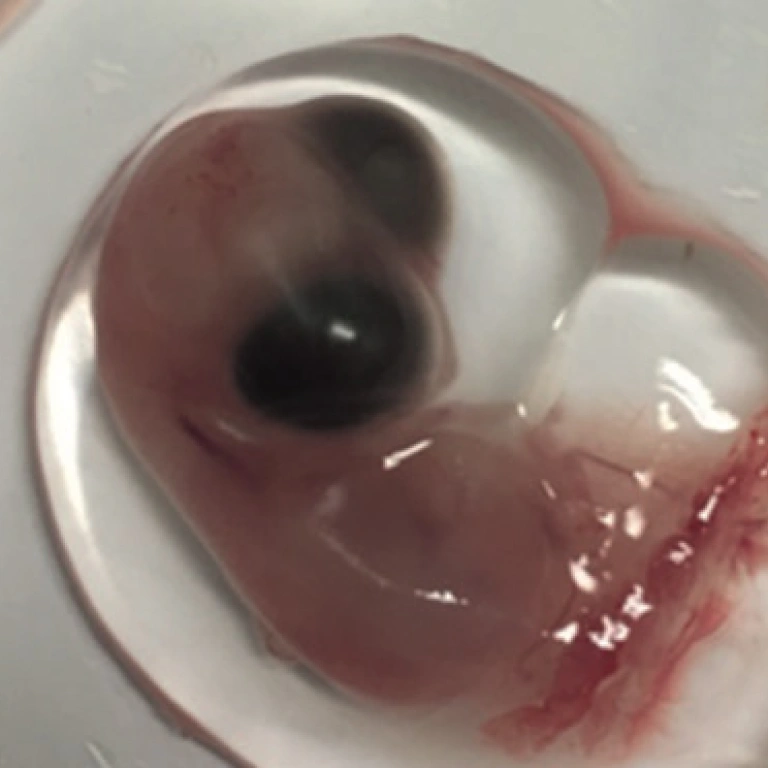
Dead at hatcher time
(19–21 days)
- See all possible causes and remedies from Dead at transfer time, 17–18.5 days
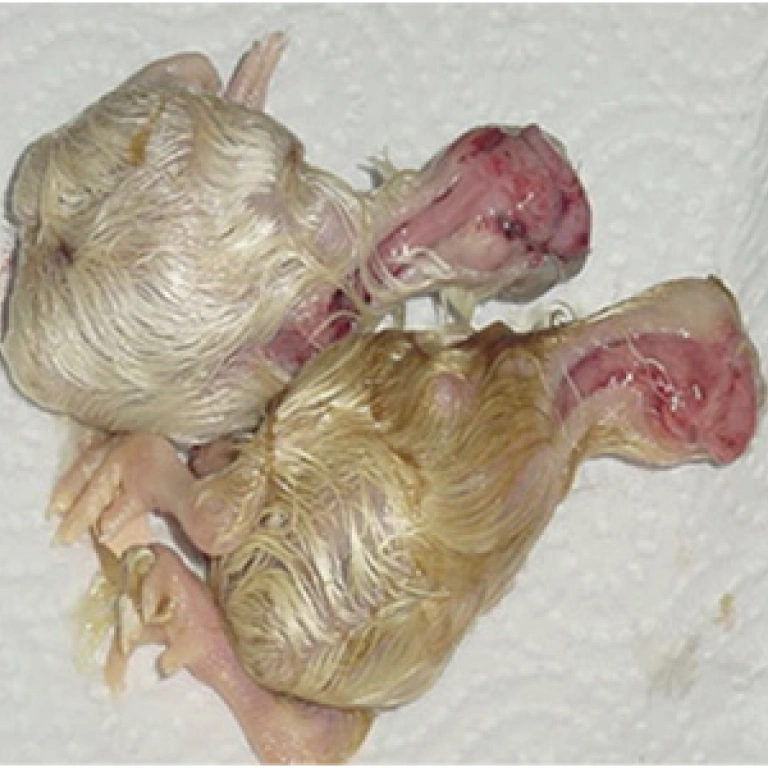
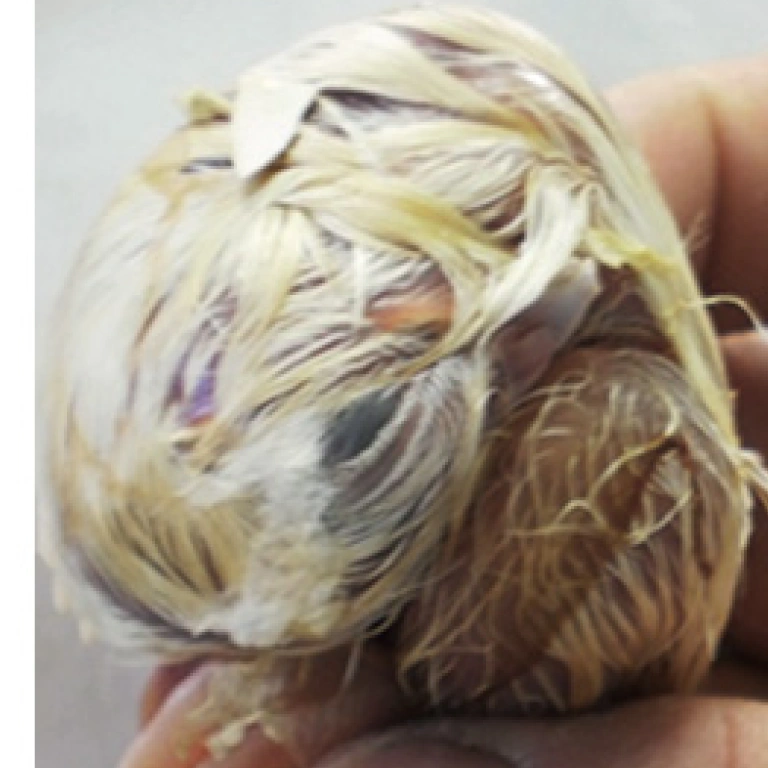
- Improper breeder nutrition: use a feeding formula with a balanced nutrient level. If feeding is responsible for the dead of chicks in this period, it can be observed that some chicks have a big oedema in the back of their head.
- Wrong hatcher step: check effective embryological time and synchronise with hatcher time and settings.
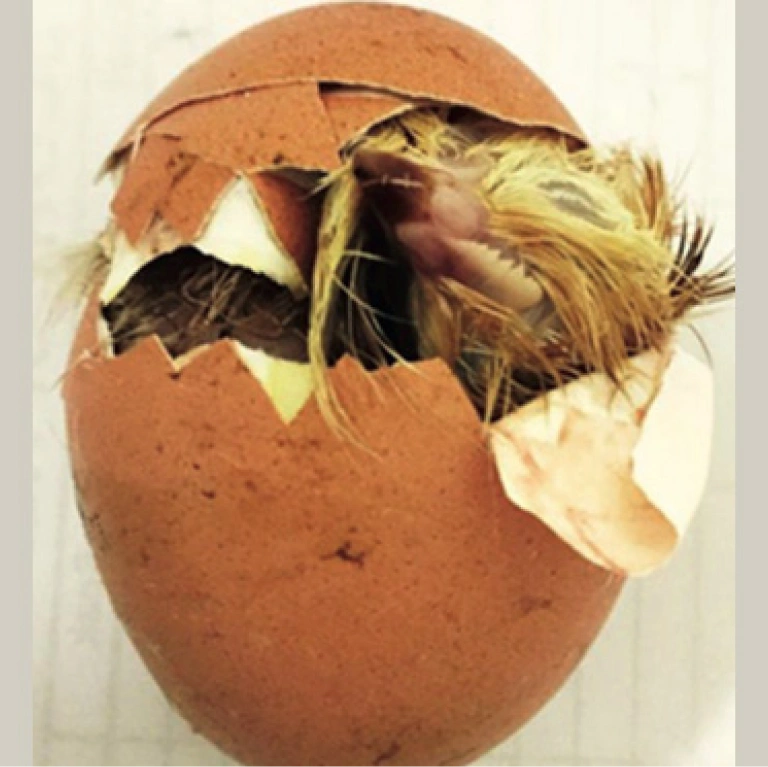
Pipped live chicks
- Improper incubation temperature: follow recommended incubation settings, not too warm and not too cold.
- Improper eggs turning: control turning function of eggs and relative correct angle.
- Improper ventilation: increase ventilation and control carbon dioxide (CO2) value, if location is high above sea level then add oxygen.
- Improper hatcher conditions: verify the hatcher setting programme and respect the steps.
- Inherited low hatchability, poultry disease: check genetic potential; test for disease in flocks; make use of medical care; check health; investigate factors under veterinarian action.
- Improper flocks nutrition: feed breeders a diet with balanced nutrient levels. If this is a problem at this stage, it is easy to note that some chicks have a big oedema in the back of the head.
- Wrong hatcher step: check effective embryological time and synchronise with hatcher time and programme.
- Wrong time: a wrong time or a too short time increases the problem.
Pipped dead chicks
- See all possible causes and remedies from Pipped live chicks
- Contamination by aspergillus: be aware that contamination can cause many problems for embryos in piping out time; the percentage of E-coli increases to a very high value and can kill chicks in this delicate phase. A correct disinfection procedure with the right product and dosage can help.
Dead at hatcher time
- Chicks are alive but no pipped shells: See all possible causes and remedies from Pipped live and pipped dead chicks
- Pay attention to machines calibration
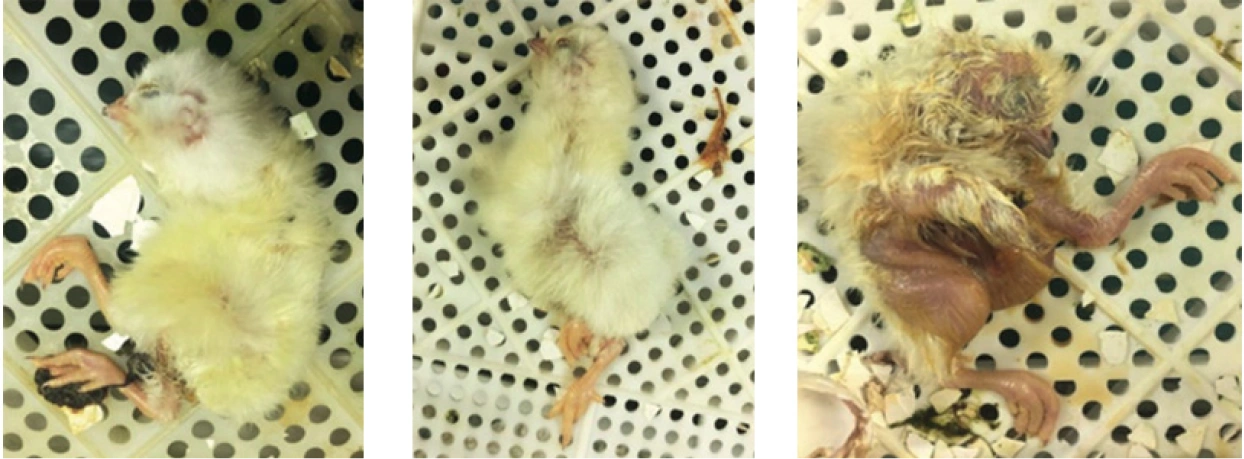
Chicks dead in basket
- Fully developed chicks outside eggs but dead: the chicks may die due to external influencing factors: aggressively manipulation of baskets by operators, damaged baskets, extremely long hatch window time or trolleys kept to long inside hatchers in critical conditions.
- Chicks are fully developed, have a soft body and a bad smell: check for contamination; check for E-coli and Aspergillus; introduce the right disinfection inside hatchers; pay attention to dirty eggs.
Broken eggs – inside setter
- Eggs which have been damaged in farm collection, in storage, handling or in setter time: check eggshell and communicate to farm manager; train operators on eggs manipulation techniques; request more gentle action.
Broken eggs – inside hatcher
- Embryos with eggshell injured or inadequate manipulation during transfer; signs of dry or sticky membrane on embryo’s body: control transfer procedure: if automatic, set to slow and if manual, ask for attention and gentle manipulation. Otherwise these damaged eggs will not hatch.
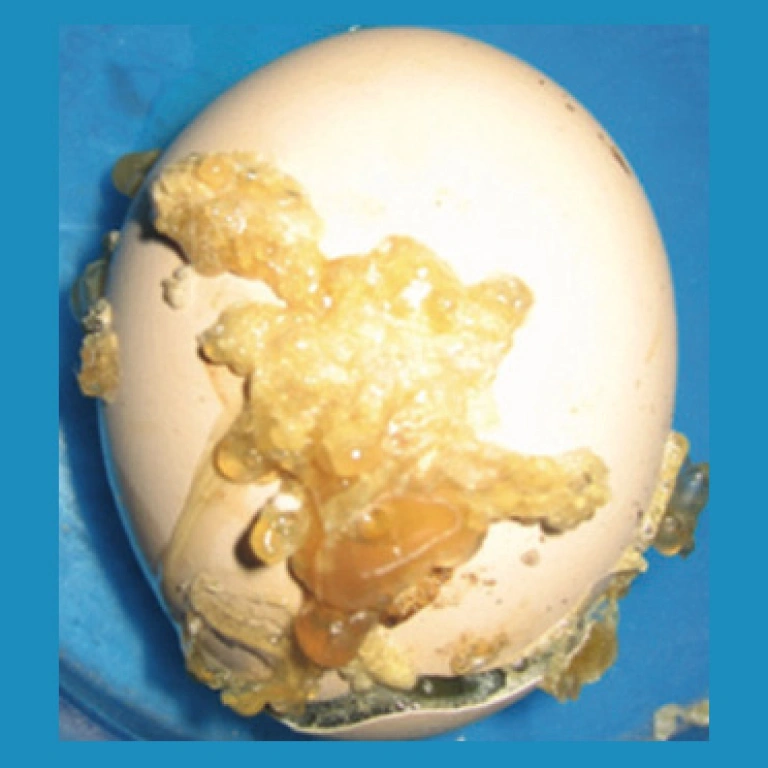
Aspergillus
- If aspergillus is present in the air cell, the membrane is having strong yellow colour: provide a fast reaction in order to increase biosecurity. It is very important to avoid the growth rate in the hatchery or inside the machines.
Practical troubleshooting based on technical service experience
- Problems usually show themselves on hatch day, so trouble shooting begins here.
- If apparently healthy chicks reach the farm but early mortality is seen work backwards.
- Was the farmer properly prepared? Was early mortality just seen on this farm? If so the problem is likely to be something the farmer hasn’t done or a problem with the transport.
- What caused the early mortality? Seek veterinary analysis.
- Aspergillosis may be from the chick litter, unhygienic transport or disease originating in the hatcher or on the farm.
Aspergillosis is most likely to originate from a hatcher which has not been well sanitised or the breeder farm. The inclusion of floor eggs in the setters, dirty nests, litter which contaminates eggs. In the setter and hatcher, a contaminated egg can spread this disease to other eggs. Salmonella, Staphylococcus and many others can be spread in the same way. - E coli, commonly found on veterinary analysis usually develops through stress, getting too hot or too cold during processing and holding before dispatch.
- All these diseases can multiply very rapidly during vaccination. The greatest care needs to be taken here, in regard to equipment, technique and general hygiene.
- Poor hatch results, from one setter or one hatcher, or the whole hatch must be investigated. Breakout analysis will help you here. Obviously diseased chicks may be due to less than ideal conditions on the farm and spread through exploding eggs at any time during incubation.
- Too many late deads or pipped eggs which fail to hatch. Many possibilities e.g. if chicks are stuck to the egg shells and are dry the humidity in the hatcher was too low. Conversely the chicks may be too soft and not alert and unable to hatch due to too much humidity. Formalin disinfection during the hatch often increases late deads. Too high temperature during last days in the setter can also reduce the hatch.
- Too many early deads may be due to formalin disinfection being overdone on the farm or in the hatchery. Problems may also be due to feed formulation, vaccination or other treatment of the breeding stock. Some of these problems may be solved by, for instance, a new delivery of feed, before the next hatch. Setting eggs as soon as they reach the hatchery – allow 24 hours rest, or more if they have been shaken during transport by rough roads. Fluctuating temperatures from collection to hatchery egg store.
- Learn to recognise a truly infertile egg. The skill is easily learnt. Complaints of high infertility often are inability to recognise the stage before a blood ring is seen
- Hatch window is too long. This may lead to some chicks being over dry and some freshly hatched.
- Any setter or hatcher giving a problem should be thoroughly cleaned and disinfected, very carefully monitored and adjustments made for the next several hatches. Electronic settings can wander which may lead to less than satisfactory results and such things as blocked nozzles and dirty filters which interfere with air flow and humidity control can lead to poor results.
Do the basics right
- If a problem occurs, check the basics first.
- Collect data regularly – also from good hatching flocks – to create your own database. Keep the records simple enough. You need to work with them.
- Do not take actions just because of the results of one breakout. Check the same flock again incubated in a different machine or vice versa.
- Assure a good communication along the production chain, especially between the breeder farms and hatchery. This will not prevent problems, but significantly minimise their economic impact.