Single-stage vs. multi-stage incubation
Single-stage means that all eggs within an incubator are set together. So all eggs are in the same embryonic stage. This enables the user to adjust the temperature, humidity and ventilation setpoints according to the needs of the embryo, possibly leading to improved hatchability and chick quality. The next benefit is the improved biosecurity as provided by every all-in all-out system. The incubator can be easily cleaned, disinfected and also maintained after each batch of eggs. Finally it can be more flexible if the amount of hatching eggs is not constant for each setting. For this reason many commercial layer hatcheries and all major breeding companies use single-stage incubation.
In contrast a multi-stage incubator is usually filled with eggs of six different embryonic ages. Therefore the multi-stage incubation environment cannot, by its nature, create optimum conditions for every egg. Temperature, humidity and ventilation are set at a fixed point throughout the whole incubation period.
One advantage of multi-stage incubation is its simplicity both with respect to the control system of the incubator as well as the management of incubation. It used to be also superior to single-stage incubation in terms of energy efficiency. Today’s single-stage hatcheries can partly eliminate this handicap with modern heat recovery systems.
The difference between the two systems is only relevant for the first 18–18.5 days of incubation. After transfer the hatcher is always managed in an all-in all-out rhythm.
Pre-warming before setting
Pre-warming, often also called pre-heating, is a procedure after storage and before setting during which the egg temperature is slowly increased to approximately 25 °C (77 °F). Prewarming is a must, if eggs are going to be set in multi-stage machines to avoid condensation on the egg shells and a big temperature drop for the other eggs. It is also beneficial for single-stage incubation as it accustoms the embryos to the beginning of incubation and in this way decreases the spread of hatch and reduces early embryonic mortality.
Some hatcheries have a special pre-warming room. This is a good way to heat the eggs evenly and the room can also be used for the egg disinfection before setting.
In the absence of such a room most people put the eggs to warm in the setter room or in the incubator with doors left open. The latter is in most cases not recommended as the limited airflow will cause a non-uniform warming.
As a third possibility many single-stage setters have a pre-heat or/and a delayed start function. Using this, the eggs can be pre-warmed inside the running machine which automatically starts incubation after the preset time. The method is convenient, labour saving and allows a very even temperature during prewarming. However you have to be aware of what really happens inside the machine. The pre-heat function of most manufacturers quickly increases the temperature to the setpoint and then tries to keep the temperature constant. It usually works, but is not exactly what we are looking for. The delayed start function mostly deactivates heating and cooling and just fresh air is sucked in by the running pulsator. Here it depends on the temperature of the incoming air and the heat produced by the electric motor. A temperature over 25 °C should be avoided as fluctuations around “physiological zero” (26–27 °C) can lead to increased early embryonic mortality.
Depending on egg mass, egg storage length, storage temperature, flock age and prewarming method the optimal pre-warming length differs. The minimum is six hours. As storage length increases or storage temperature decreases pre-warming length should be extended to twelve hours or more. It is no risk to go to 18–24 hours as long as the temperature is balanced and not too high.
Setting time and pattern
The setting time is determined by the schedule on hatch day, the source of hatching eggs and the incubation conditions.
In general the incubation time for prewarmed eggs is 21 days and 3–6 hours for Brown Nick and 9–12 hours for Nick Chick / Super Nick. H&N Coral and Siver Nick need approximately the same incubation time as Brown Nick.
Extra time should be given depending on:
- Egg storage time (1 hour per day exceeding 5 days)
- Flock age (3–6 hours for flocks < 30 weeks and > 50 weeks)
Additionally there is time needed to heat up the eggs to incubation temperature. In a regularly filled multi-stage machine this process happens quite quickly (three hours), but in some single-stage incubators it can take up to twelve hours.

The following example explains the necessary calculation:
- Start of hatch planned for Thursday, week 4 at 7 a.m.
- Nick Chick / Super Nick – eggs, 10 days egg storage, middle age flock
- Incubator heat-up time 6 hours
- 21d10 hours + 5 hours + 6 hours
- Incubator should be started on Wednesday, week 1 at 10 a.m.
Incubation time can differ depending on the incubation condition in the individual hatchery or flock characteristics. Therefore it is recommended to control the correct timing regularly (see chapter “Hatcher”) and adjust the setting time if necessary. This will help to maintain a high level of chick quality.
Incubators give best results if they are full, and the eggs are of the same age and from the same flock. This is often not possible and a compromise has to be reached. If the setter is not full, the trolleys should be ‘balanced’ which enables the air flow to work correctly. The top two and bottom two trays can be left empty of eggs but the spaces should be filled with empty trays. Occasionally, it is necessary to have whole trolleys empty but they should be put in complete with empty trays. Another way is to fill with eggs from another flock or another storage time. If different batches of eggs are going to be set together please ask your machine manufacturer for advice and experience with your specific incubator type. Incorrect filling in multistage incubators can create big problems, resulting in disappointing results.
Temperature
Temperature is the most important incubation parameter. It mainly determines the speed of embryo development and it has to be kept within a small range to assure optimal hatchability and chick quality. However, the embryo temperature rather than the incubator temperature is critical. As this cannot be measured without damaging the egg, the usual practice is to determine the eggshell temperature (EST) with an infrared thermometer. When doing this, it is important to ensure that the measurement is carried out at the “equator” of the egg and not at the top above the air cell. Otherwise, in the case of a developing embryo, the value recorded will be too low.
EST measurement should be taken by suitably trained Staff only. The required sample size is 10–15 eggs per trolley and from the middle of a tray. Readings of clear eggs are not relevant for the calculation of the average. One should aim for an EST of 100 °F during the first twelve days of incubation. A fluctuation range of 99.6 to 100.4 °F between the eggs is acceptable.
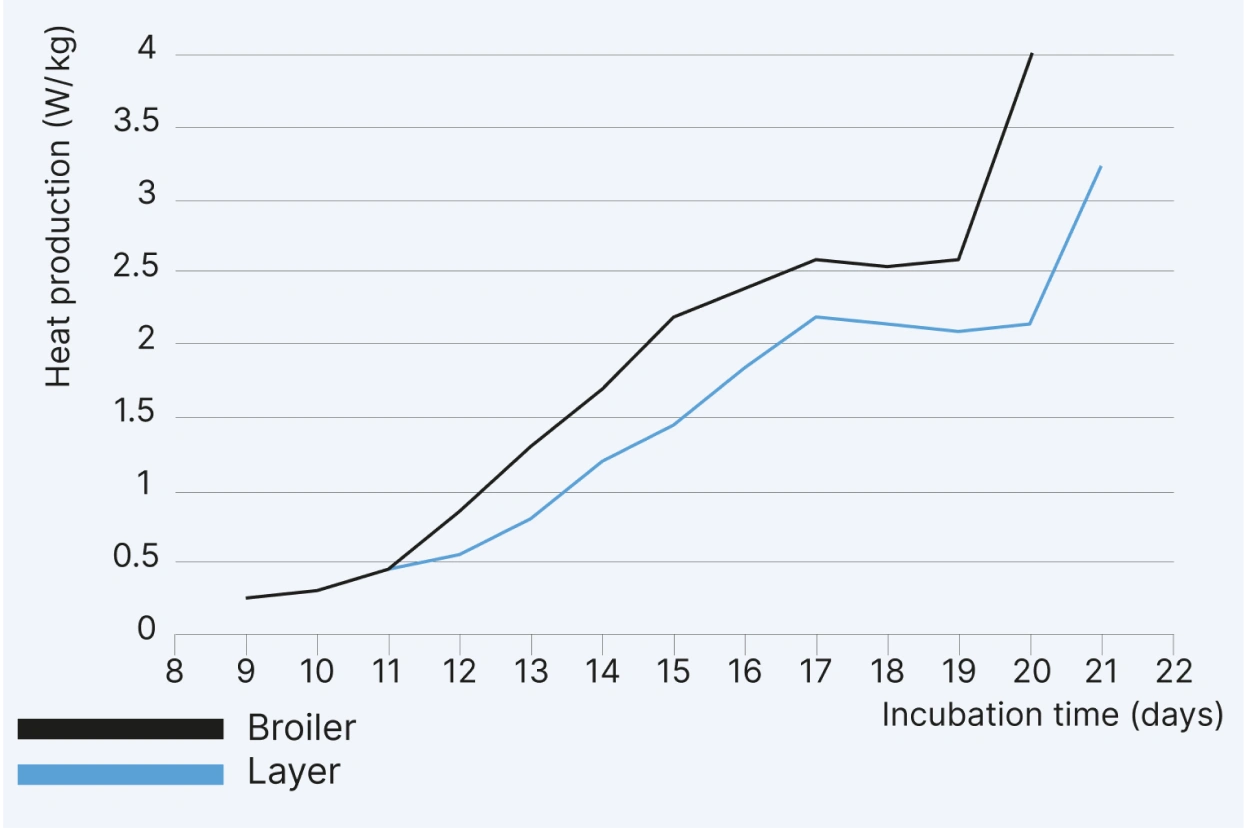
After the twelfth day, the embryo begins to grow more quickly and to produce more heat. This requires increased ventilation and cooling of the incubator which leads to a greater variation in EST. This effect is reinforced by a high number of “clear” eggs which do not produce any heat and create relatively cooler areas on the trays.
At this stage, it may be the case that, at an average EST of 100 °F, even eggs with living embryos constantly have an EST below 99.5 °F. These embryos develop slowly and there is a risk that they will be rejected as “pips” or “too fresh chicks” when the chicks are taken off. To avoid this, the average EST should be allowed to increase slowly by 1–1.5 °F from the 13th to the 19th day when transfer takes place. As a second advantage this limited rise in egg temperature acclimatises the embryonic tissues for the body temperature of the hatched chick (40 °C, 104 °F).
In many hatcheries, there is a tendency to very high EST. However, temperatures over 102 °F have a negative effect on chick quality and can also reduce the hatching rate.
To achieve the desired egg temperature, the incubator temperature has to be lowered step by step during incubation until day 16. From that moment on the heat production is only slightly increasing until internal pipping and therefore the machine temperature can be kept constant.
In general the overall temperature should decline from day 0 until day 16 by 1.0–1.8 °F. The decrease has to be higher the more heat is produced by the embryos (egg size, fertility, oxygen availability), the lower the air speed (incubator model) and the lower the heat capacity of the air is (humidity). The starting setpoint is mainly determined by the design of the incubator, which means the air flow inside of the machine, the position of the sensors and the way of calibration. There are setters on the market which require a setpoint of 99.6 °F to achieve an average egg temperature of 100 °F and others need to be set at 100.6 °F.
Therefore it is at this point impossible to give a detailed recommendation for an incubation program that works with every equipment available and performs well under the individual conditions of each hatchery. Please seek the advice of your manufacturer and don‘t hesitate to contact also our technical service department to ask for our experience with your incubator model. There is a proposal for an incubation program, experienced with conventional single stage Petersime equipment, in the appendix of the guide.
Naturally in multi-stage incubators, the EST cannot be controlled in this way because adjusting the incubator temperature always involves a compromise for various stages of incubation.
Humidity
Humidity and the way it is provided can influence the incubation success by several ways. Firstly it affects the moisture loss of the eggs. During incubation water vapour is lost through the pores of the shell. The rate of water loss is influenced by the egg shell conductance and the water vapour pressure difference between the egg and the surrounding air. The water vapour gradient depends on the temperature and the content of water in the air. At a given temperature the water content of the air can also be recorded as relative humidity or wet bulb temperature. Practically the moisture loss can be determined by simple weighing, because any weight loss is solely due to the loss of water from the egg. There have recently been automatic egg weighing devices introduced by manufacturers, but these systems are relatively expensive and still have to prove their technical reliability. Manual weighing with a simple and cheap electronic scale is effective and has been used for many years.
The usual procedure is to mark and weigh 3–6 sample trays before setting and reweigh them at transfer. When calculating the percentage do not forget to take into consideration the weight of the empty tray. The same trays can be used for examination of embryo mortality and to measure chick yield.
It is also good practise to weigh a whole trolley using a platform weighing machine.
The weight loss until day 18.5 (transfer) should be 12 %, with an acceptable range from 11–13 %. This will ensure that the majority of the eggs experience a moisture loss that is high enough to form the air cell necessary for internal pipping without risking the dehydration of the chicks.
If the weight loss differs from 12 % by more than 0.5 % the humidity set points can be adjusted for the next incubation period. By rule of thumb the humidity set points during incubation should be increased by 1 °F (2 % relative humidity), if the weight loss target is exceeded by 0.5 %. Of course this works also the other way round.
When flocks are ageing the quality of the egg shell is declining and egg shell conductance is increasing. Therefore for eggs from old flocks a higher humidity set point is required to avoid excessive moisture loss. The opposite is often seen when dealing with very young flocks that are producing eggs with very thick shells.
If you incubate eggs for the first time without having an idea about the necessary humidity set points it makes sense to re-weigh the sample trays during incubation, for example after 7 days. This leaves time to react, if the moisture loss is not on target. As an initial set point, which should be adapted by your own experience, we recommend on average 53–55 % relative humidity or 84–85 °F wet bulb reading.
These adjustments are only possible if the incubator is filled with one or at least similar batches of eggs. If different flocks or breeds are mixed, it is not possible. Very long stored eggs might require higher humidity settings as they have already lost more moisture during storage (0.1 % per day).
It is generally accepted that high moisture loss during storage is detrimental, although it would be possible to compensate it by higher humidity during incubation. Therefore not only the amount of moisture loss is important, but also the timing. In multi-stage machines the moisture loss is almost linear, because humidity and ventilation setpoints are fixed. In modern gas tight single-stage incubators the humidity during the first days of incubation is very high, because the ventilation is usually kept closed. Thus the eggs lose relatively less moisture during the first days, which is compensated by a low humidity and hence increased moisture loss during the last week in the setter.
There is no evidence that a slight non-linear weight loss per se influences chick quality or hatchability. But a steep one, when keeping the damper closed in modern gas sealed incubators for more than seven to ten days might be negative for layer type breeds. However some manufacturer promote it, as it has other benefits that will be discussed in the next paragraphs. The system has been developed for broilers but has not been proven to be very successful with layers.
The second important feature of humidity is the heat capacity of water. Air is able to carry more heat the higher the humidity (content of water) is. This is easy for everyone to notice when pouring water on the rocks in a sauna. Air with a high heat capacity inside an incubator leads to a more uniform temperature. Of course this is always an advantage, but during the first days of incubation the embryo is very sensitive to environmental changes and hence can benefit most from a stable one. Additionally, a high humidity can be more easily achieved during the early than the later days, because the oxygen requirement of the eggs and hence the ventilation rate is limited.
As becomes clear at this point humidity and ventilation settings can’t be discussed separately. Both partly depend on each other and on the condition of the incoming air. If the incubator is asked to keep a high humidity, when the ventilation rate is high and the water content of the incoming air is low, it is forced to add a lot of humidity by itself. This water needs to be evaporated, and that takes a high amount of energy. As this energy is provided mainly by the eggs in the machine, it will have a cooling effect on the eggs. The problem with this evaporation is that it happens locally. The eggs that are close to the ventilator and sprayer get all the water and will be cooled a lot. Eggs that are far away will stay warm. This means that high amounts of spraying often lead to non-uniform temperatures of eggs. If water rolls are used instead of sprayers, the effect is less dramatic but will still occur.
The pre-conditioning of the incoming air according to requirements of the incubator (usually temperature 25 °C, humidity 50 % RH) minimise the need for spraying and leads to a more uniform incubation temperature.
One can summarise, that eggs need to loose 11–13 % moisture during incubation until day 18.5. This can be achieved by a constant humidity setpoint or by high humidity (87–88 °F wet bulb) in the beginning and low humidity towards the end of incubation (81–82 °F wet bulb). A slightly non-linear weightloss can be beneficial, if it leads to significantly less spraying in the incubator.
Pay attention that the humidity does not drop too far (35 % RH, 75 °F Wet Bulb) during the second half of incubation. Otherwise the cooling of the eggs can be impaired, because of the low heat capacity.
Ventilation
The primary purpose of the ventilation of an incubator is the supply of oxygen and the removal of CO2. It is also necessary to remove the water vapour evaporated by the eggs. Depending on the machine type it can also be needed for cooling. The fresh air used for ventilation need to be conditioned according to the requirements of the machines in order to allow them to work at their optimum.
With regard to the whole hatchery the ventilation is also crucial for biosecurity. Via air pressure differences one should make sure that no air can flow from dirty areas of a hatchery (chick processing room, fluff chamber, waste) to clean areas (setter room, egg room). Additionally frequent air exchange helps to dilute aerial contamination. Finally one should not forget that ventilation should contribute to provide suitable working condition for the hatchery staff.
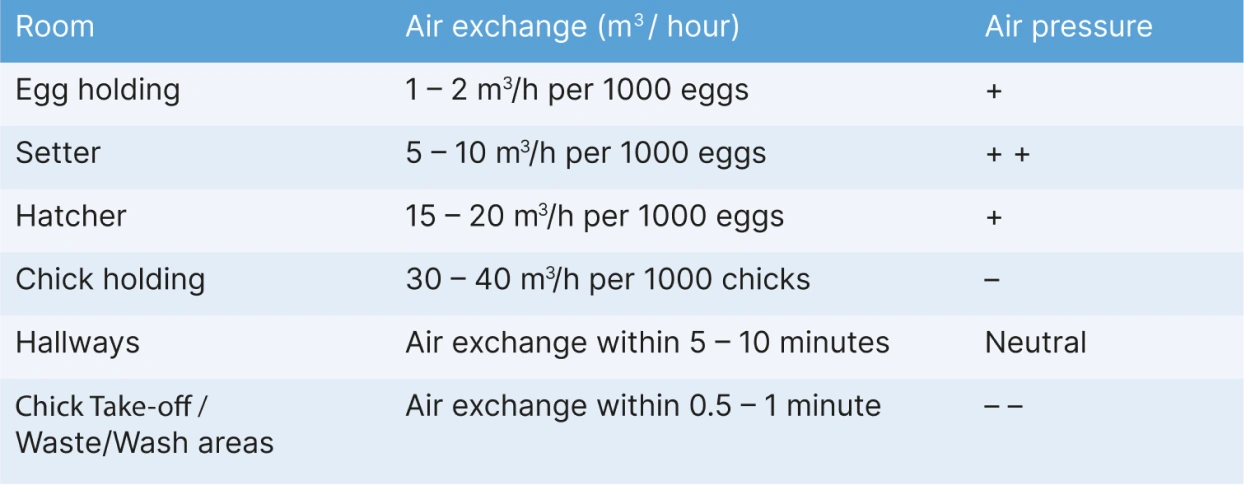
The suggested air volumes for setter and hatcher rooms allow for both the requirements of the machines themselves and the room. Because the machine requirements will vary from day to day, excess air must be allowed to exhaust from the room without passing through the machines. As the ventilation systems differ, we recommend to always seek the advice of the manufacturer. The ventilation of the individual incubator should be based on the oxygen requirements of the embryos. These are very limited during the first seven to ten days of incubation, rise rapidly after eleven to twelve days and reach a plateau after 17 days. To meet the oxygen demand one can either set the ventilation rate for different stages of incubation or let the damper be steered by a CO2 sensor. The latter has the advantage of automatically adapting the ventilation to the number of fertile eggs in the incubator. Based on observation in practise one should aim at a CO2 value between 0.2 % and 0.4 %. Higher CO2 values up to 1 % are not lethal, but also a positive effect has not been proven for layer chicks. As far as our experience goes, the CO2 is just a hint for the right air exchange. Measuring CO2 can avoid unnecessary ventilation and by this way contribute to a stable incubation climate. On the other hand it can also detect ventilation problems. There is probably no specific CO2 value needed for good embryonic development. By rule of thumb, if the ventilation settings are correct for any one setter or hatcher, the CO2 will be found to be correct.
If one prefers to allow a ventilation range, which is controlled by the humidity, it is a must to set a minimum ventilation rate. It has to be high enough to assure the sufficient supply of oxygen and removal of CO2.
Turning
During natural incubation the adult bird will periodically rise from the nest to move its eggs around. This turning was recognised to be important for the incubation success and is implemented in today’s hatchery practise. It is beneficial by preventing the embryo from sticking to the shell membrane and promoting the utilisation of the albumen. By tradition, eggs are turned hourly by 45° throughout the setter period. The results of trials using more often or less turning are so far inconsistent and turning 24 times per day is still recommended.
Research has shown, that day 3 to 7 is the most critical period for turning, as failures during this time have the highest impact on hatchability. On the other hand, there seems to be no need for further turning after twelve days of incubation. In single-stage incubators, this could save energy by switching off the turning device. To our knowledge this is so far not implemented in commercial hatchery practise.
Do the basics right
- Do not set eggs the day of lay.
- Pay attention that no egg sweating occurs when moving the eggs in the setter room.
- Properly pre-warm the eggs, especially, if they are going to be set in a multistage incubator.
- Only set eggs in well cleaned and maintained machines. Check heaters, coolers, humidifiers, turning device and dampers.
- Check that the trolleys are properly connected to the turning device.
- If necessary, add empty trolleys with empty trays to fill up the machine completely.
- Control the incubator temperature and humidity by using a mercury door thermometer or a good electronic device. Calibrate if necessary.
- Check egg weight loss and eggshell temperature regularly to fine tune the incubation program.
- Check, if the conditions of the incoming air meet the requirements.