Onset of production (18 – 22 weeks)

PERIOD AFTER TRANSFER

During the first days after housing, it is important to stimulate sufficient feed intake. The hens should increase their feed intake as fast as possible and continue gaining weight (see figure 1).
Some useful recommendations:

  • Provide attractive feed with a good structure that avoids fine particles.
  • Provide good quality, fresh water.
  • Run the feeding lines frequently during the day.
  • Feed on an empty feeder.
  • Ensure there is enough light at the feeder
  • Feed on an empty feeder.
  • Light intensity should be higher in the laying house than in the rearing house.
  • Avoid excessive stimulation when transferring birds to open houses.
  • Crop filling score: The goal is to have 100 % at 24 hours after transfer (check 100 females and 100 males). If is not 100 %, a complete review of all managements must be
    performed.

LIGHT AND LIGHT PROGRAMS

There are two main factors that stimulate the onset of laying in the flock:

    • Body weight
    • Photoperiod

In the absence of other stimuli, hens will begin to lay when they reach an appropriate body weight. However, the duration of the photoperiod can stimulate or delay the onset of lay as follow:

      • Stable or increasing photoperiods with a duration exceeding 14 hours will stimulate the onset of lay.
      • Stable photoperiods with a duration of less than 14 hours will delay the onset of lay. Decreasing photoperiods should never be used in production period.

CHOOSE THE RIGHT STIMULATION AGE

How to choose the right stimulation age
Normally a flock should be kept with a stable photoperiod until light stimulation starts. If hens are in the weight range, a standard recommendation for standard production is 18 or 19 weeks of life.
However, this may vary according to:

      • Flock body weight status: If the birds’ body weight is far below the standard it is preferable to delay light stimulation for at least one week. Equally, if the uniformity is very low (less than 80 %)
        and/or the CV is very high (> than 10) and the weight of part of the flock is far behind the standard, later light stimulation is preferable.

The objective is to achieve as fast as possible an egg size of at least 50 to 52 grams, which is suitable for incubation. The goal is to reduce the number of unsettable eggs at the beginning of the production.
Never stimulate before 18 weeks of age.

TAKE THE NATURAL DAY LENGTH INTO ACCOUNT
The light program in open houses should take the natural day length at the stimulation age into account. Determine the light program during rearing as explained in section X. Stimulation should differ depending on the day length.

        • Increasing day length period: risk of flock being stimulated by natural light before they reach the correct body weight. To avoid this, the artificial day length should always be longer than the natural day length until the flock is ready to be stimulated. This should be considered in the rearing light program.
        • Decreasing day length period: flocks exposed to decreasing day length can show delayed onset of lay. To avoid this, create an artificial day length longer than the natural day length from week 10.

To achieve this goal, use the app: H&N lighting program

USE CORRECT LIGHT STIMULATION

MANAGEMENT UNTIL THE PRODUCTION PEAK

FEED:
The birds need a good quality feed, with the structure and nutrient density necessary to suit their feed intake as well as provide their egg production, growing and maintenance requirements. Nutrient requirements in this phase increase rapidly so the feed intake of the birds should increase simultaneously. If not, the birds’ nutrient requirement will not be met and they will be forced to mobilize their reserves. This may lead to soft bones and potentially harm the bird for the rest of the laying cycle. Switching to a layer diet with more than 2.5 % calcium stimulates the birds to lay eggs. This feed phase aims
to cover the requirements to obtain the maximum egg mass. Check if feeders are also accessible for males, they are bigger than females and have big combs that could be an obstacle in some feeder lines.

WATER

Cool water of good quality should always be available with the required water flow. Continuously monitor the water quality. Water consumption is normally 1.5–2 times higher than feed consumption. It is highly recommended to monitor the water consumption for early detection of possible problems. Regular cleaning and flushing of the water lines as well as the supply tank is essential. Water consumption will clearly increase at 10–14 days prior to the onset of lay. During this period, the ovary and reproductive organs will develop, and water will be stored in the follicles of the ovary .

In aviary systems, keep an eye on levels where only water or feed is available. Pullets who don’t move from one to another level will emaciate and/or dehydrate. You could pick up some pullets and look if there is water/feed in the crop.

SPACE
The birds should have enough space, especially in hot climates. Important aspects are not only cm² of cage floor/bird, but the height of the cage, which is especially important for males to allow a normal mating, how many cm of feeder, and how many drinkers are available per bird. The temperature should be between 18–24 °C.

VENTILATION AND TEMPERATURE
Proper ventilation should be used to guarantee good air quality in the house, and ensure a low concentration of gases and dust. At the same time, the temperature in the house should be optimally maintained between 18–25 °C (64.4–77.0 ˚F) with a relative humidity of 50–60 %. Birds do not tolerate temperatures above 30 °C (86.0 ˚F) well, especially if high temperatures are combined with high humidity. During heat stress, ensure that sufficient air circulates around the birds. The use of additional fans as well as evaporative coolers should be considered to reduce the house temperature.In aviary and floor production, ventilation and temperature is even more important to start with a good house temperature before transferring the pullets. The stocking density is less than cage systems, and we need good temperature and ventilation to stimulate pullets to find water and feed on the different levels in the system (important in aviaries). Mortalities smothering and floor/system eggs can be enhanced by poor ventilation.

NEST MANAGEMENT

Points clés de l’utilisation des nids dans les systèmes sans cage:

    • Right position of the nest boxes with drinking lines in front of them
    • Use clean, automatic closing nest boxes with comfortable floor/mat.
    • Nest boxes in the best right intensity of light (enough to find the nest, and inside dark enough to keep birds quiet).
    • Enough nest space (refer to page 28)
    • Breeders should not be allowed to have access to the nests too early. Open the nest boxes 1–2 weeks before the onset of lay. Open them 3–4 hours before start of day-lighting program and close 1 hour before the end of the lighting program (NEVER leave them open overnight)
    • In an aviary system with on tier/level of nest boxes the birds need some more time to find the nests than a traditional floor house with slats or combi system where you have nest boxes on every level.
    • System with on-line nest boxes can be equipped with incorporate barriers. Best way to use them every 2 meters at 6 meters from every compartment wall. This to prevent high density in these front and back nests.
    • In case, of early production eggs you can also use very low light intensity lights inside the nests. This light can start 1–2 hours before the start of lighting program to give the birds that produce early to find the way to the nest boxes. These 1–2 hours are not included in the daylength.
    • Always try to use more than standard nest space in cage-free systems to catch all the birds/eggs during the laying process. Especially at the onset of production of very uniform PS flocks.
    • After the production peak and > 30 weeks, we can start gradually closing the nest boxes a bit earlier every 1–2 weeks. In the afternoon, the birds don’t need access to the nest boxes. This is especially important if you start to see a lot of dirty nests (bedding or mat) and eggs due to nest material. In the afternoon, the birds don’t need access to the nest boxes (after the production period – 10 hours after lights on.
    • Close the nest in very small steps, and keep an eye on total number of eggs, and number of floor/system eggs. When these numbers stay same level, you can make the next step.
    • For a correct nest management, always keep in mind the difference in the laying behavior between white and brown strains:
      a) Browns tends to start the production earlier than whites, so the egg collection must start earlier.
      b) In white flocks, at peak production hour a higher % of females are laying, plus the hens stay longer inside the nest than browns, therefore nest space is more critical for the white breeders than Brown Nick breeders.

The management in the rearing period is critical to success in the training for nest use:

      • Use of perches, water tables, etc.
      • Lighting management.

The first 8 to 10 weeks post-hatch are critical to imprint the desirable behavior in our birds. Therefore, the importance of optimizing the rearing periods, particularly for birds going into cage free housing systems is extremely important. Environments with simple rearing systems are not cognitively stimulating or spatially complex enough to adapt pullets to navigate in aviary or even on floor system.
If we don’t provide perches or stimulate the pullets to jump on platforms in the rearing house, the chances to have a non-desirable % of floor eggs could be high.

MALES MANAGEMENT

Rearing

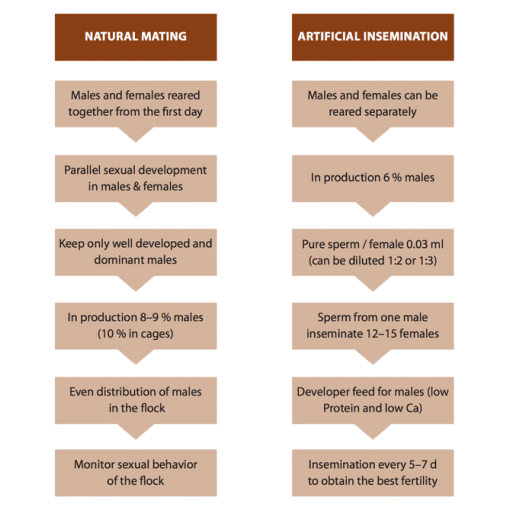
Males and females should be reared together from the first day if they are going to be under natural mating conditions in production. Males from white breeders without comb treatment need to be separate until 7
to 8 weeks of age to select the sexing errors. Do not dub brown males unless you have problems with feeders/grills in rearing or production.

Don’t beak treat males (if you think you should beak treat them, ask H&N Technical service for advice). When is possible, males should be comb treated to avoid problems with feeder lines grills. This is a must when they will be housed in cages.

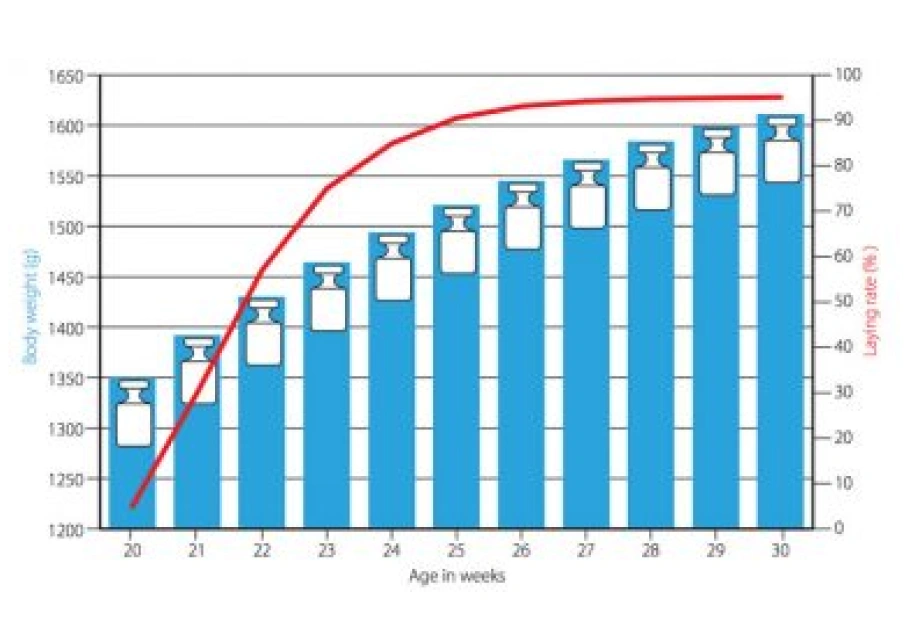
Males should be healthy and develop according to the standards as a predisposition for good mating behavior and good sperm quality. To achieve this, is important to follow the recommended stocking density, feeder and drinker spaces. Check weekly male’s body weight (always at standard) and uniformity (> 85 %). There are two critical periods when the body weight gain is extremely important and must meet the standard, the first is between 2 and 10 weeks of age, when the reproductive organs are developing and then, after light stimulation where is a fast growth of the testis. At 10 weeks of age and before transfer (light stimulation) from rearing to the laying house a selection of the males should be made to only keep males in good conditions.

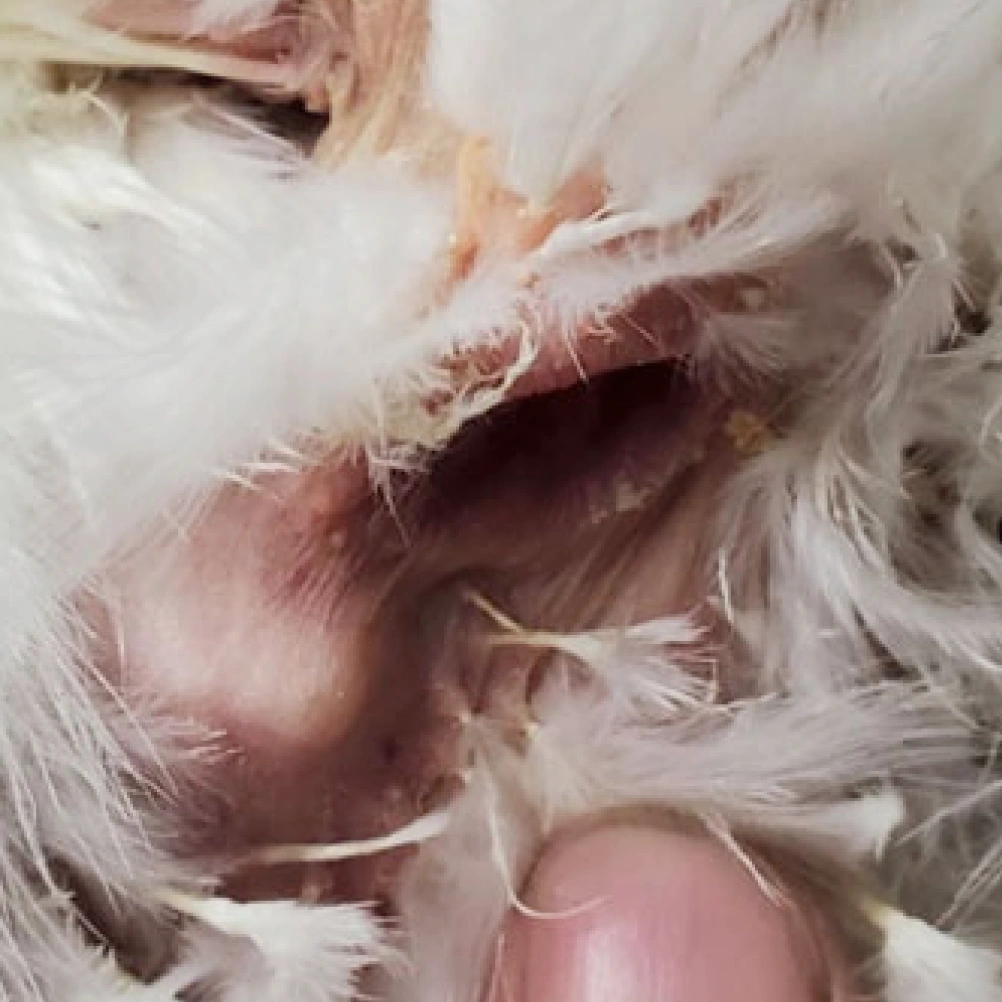
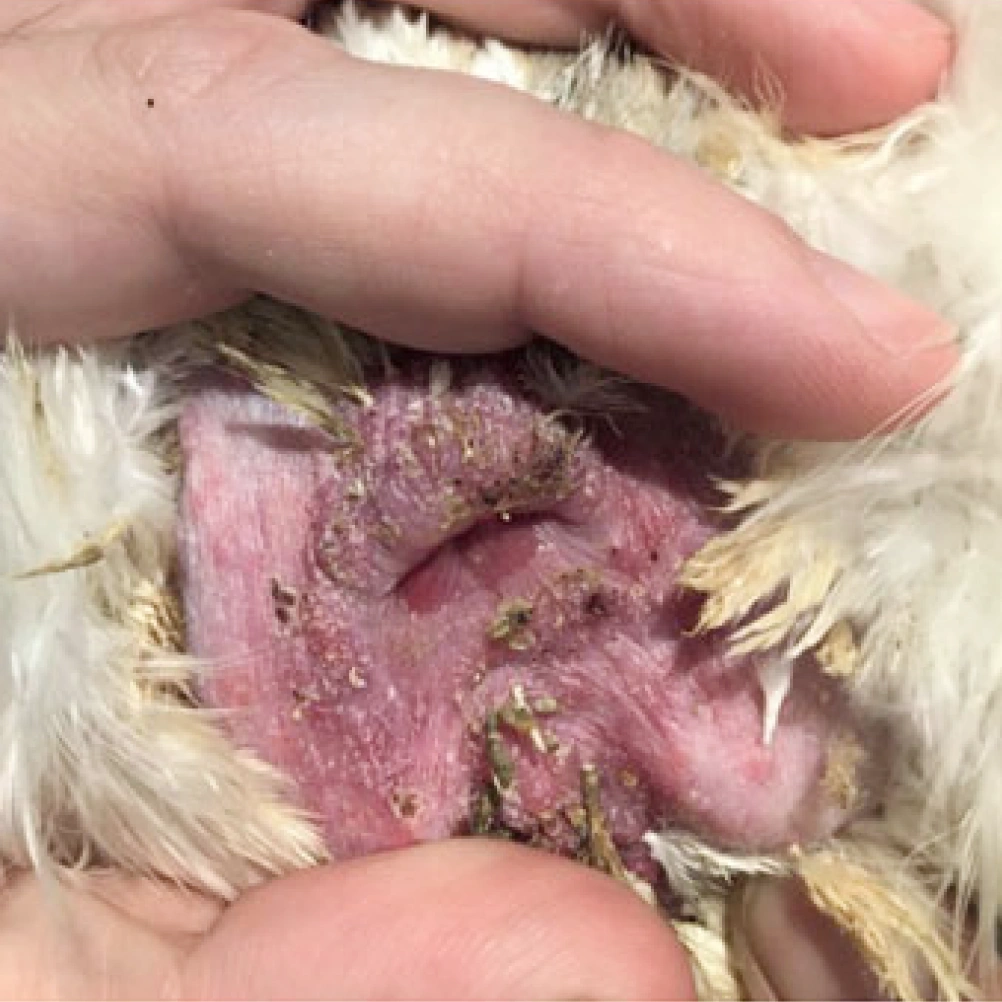
Males with low body condition, leg problems, skeletal defects or bad feather cover will be sorted out. Furthermore sharp, hooked, short or uneven beaks should be selected since they can damage the females at mating. All time, the stage of development should match to the development of the females based on comb, wattle and feather as indicators: If their dominancy develops too early, the males are getting active before a sufficient number of females is sexually mature, and as a result the males start chasing females, over-mating occurs, males start fighting each other, females are getting damaged
and scared and as a final result, fertility is too low.

If their dominancy develops too late, the males will not become dominant over the females and will be scared to mate with them. The males can be physically well developed but will not mate because they think they are not able to do so and as a result, again fertility is too low.

Production

Males in natural mating should develop dominance over the females otherwise they will not mate. Therefore, is important to keep an eye on the condition of the males during the laying period and check weekly the
body weight development of the flock until week 30 and then biweekly.

Monitor carefully and permanently the sexual behavior of the flock and a good and even distribution of the males (especially important in the afternoon, during the mating period). An effort should be done to keep a good feather cover, otherwise females with naked backs will avoid males. Depending on environmental condition the mating ratio ranges between 8 and 10 males per 100 females. In controlled environment, usually 8–9 % are optimal. In open or slatted floors and hot climate 9–10 % are recommended. Not always more is better, more males than needed causes disturbance in the flock resulting in reduced fertility.
It is a good practice to start at 20 weeks with 9–10 % males in natural mating and 7 % in artificial insemination and proceed to select males with poor condition during production to achieve 8–9 % and 6 % respectively of good quality males at 25–28 weeks of age and during production (for male/female ratio in family cages please ask H&N Technical Service).

Vent colour is a good indicator of the male’s mating behavior, in an active male should be strong red and not pale and the variability of vent colour between males should be small. Males with pale vents and underweighted should be sorted out. In family cages, is critical to keep an eye on the males quality and behavior, because the decline in fertility could be faster than in floor systems. Every 2 weeks do fertility checks ad when necessary apply intra-spiking or spiking. Always keep a group of extra males in a pen (better if they are younger than the flock; more details in the male’s management Technical Tips.

Fertility

    If fertility problems appear in a flock check:
      • If fertility problems appear in a flock check:
        • Bad physical conditions of the males and
          females (overweight or underweight).
        • Disease.
        • Nutritional deficiencies.
        • Sexual behavior of males and females.


ONSET OF LAY

Monitoring production data is essential for timely intention in response to any issues that occur in the weeks between the first eggs and the production peak. Production data should be monitored daily or at least weekly.

% LAY
This should increase daily. During the first week, the increase may be small, but a bigger increase should be seen every day. In the middle part of onset of lay, the increase should be stronger, at least 2% per day and ideally close to 3%. Finally, in the last week, the increase should be close to 1% until the production peak is reached. The rate of increase cannot be monitored correctly if the eggs are collected at different times!

BODY WEIGHT
Increases could be a little erratic as not all the hens develop their reproductive system at the same time. However, body weight should never decrease, and a clear growth trend should be observed.

FEED AND WATER

As mentioned, consumption should increase every day. Water is the easiest parameter to monitor daily and is a critical management measure.

Female body weight and % lay until week 30


Brown Nick

Nick Chik, Super Nick, Crystal Nick and Coral

KEY POINTS

  • Monitor how well the flock has adapted to the laying house by measuring water consumption daily and body weight weekly.
  • Evaluate crop filling score 24 hours after transfer.
  • Control the onset of lay and egg weight by correctly applying light stimulation.
  • Never decrease day length in the production period.
  • Closely monitor the increase in egg production, body weight (males and females), feed and water consumption during the weeks preceding the production peak. If the flock is not performing correctly, take corrective measures as soon as possible.
  • Keep an eye on male’s behavior especially during the last 4 hours of the lighting program.