The hatching egg
The hatching egg is not “just like any egg”. It contains a living embryo which has all the genetic potential the R&D department of H&N International has combined over many years of selection.In order to enable the embryo to express this potential during incubation and in later life as a pullet and laying hen, good hatching egg quality is crucial.
The hatching egg quality is mainly influenced by these factors:
- Condition and health status of the parent stock flock
- Age of the parent stock flock
- Medication
- Feed quality
- Water quality
- Type of housing
- Climate
- Percentage and quality of males
- Type and cleanness of nest boxes
- House temperature
- Collecting of the hatching eggs
- Storage and handling of the hatching eggs
- Disinfection of the hatching eggs
The factors are arranged in two groups. The first group determines the quality of the egg at point of lay. This means egg size, shell quality, the nutrients and maternal antibodies transferred to the egg determining albumen and yolk quality and finally the fertility.
The second group of factors affects the hygiene status of the egg and the ability of the embryo to survive storage.
The freshly laid egg has the temperature of the hen’s body (41 °C) and the egg surface is slightly wet. Cooling down to house temperature causes a contraction of the egg contents leading to air entering the egg which creates the air cell.
To minimise the amount of germs penetrating the egg shell during this critical time, it is very important that the egg is laid in a clean nest.
Floor eggs are not regarded as good hatching eggs. It is very likely that they have already been contaminated by manure contact, before they can be collected, cleaned and disinfected.
If you use floor eggs in the hatchery there is a high risk that these eggs will compromise the quality of the other eggs and chicks. Therefore store and incubate floor eggs separately (or at least on the bottom trays) and transfer, pull and process them after dealing with the good quality ones.
Good quality eggs for the hatchery should match the following criteria:
- Clean egg shell (No manure, litter, feathers or blood)
- No cracks
- Well shaped
- No double yolk
- Weight range according to hatchery policy (usually 52 68 grams and some hatcheries go as low as 48 g)
- Set with the pointed end downwards
Optimal egg storage condition
When an egg is laid, there is already a small embryo present with approximately 40000 cells. The vitality of this embryo must be preserved until the point when the incubation process finally starts. To achieve this, the eggs have to be handled carefully and temperature ups and downs should be avoided.
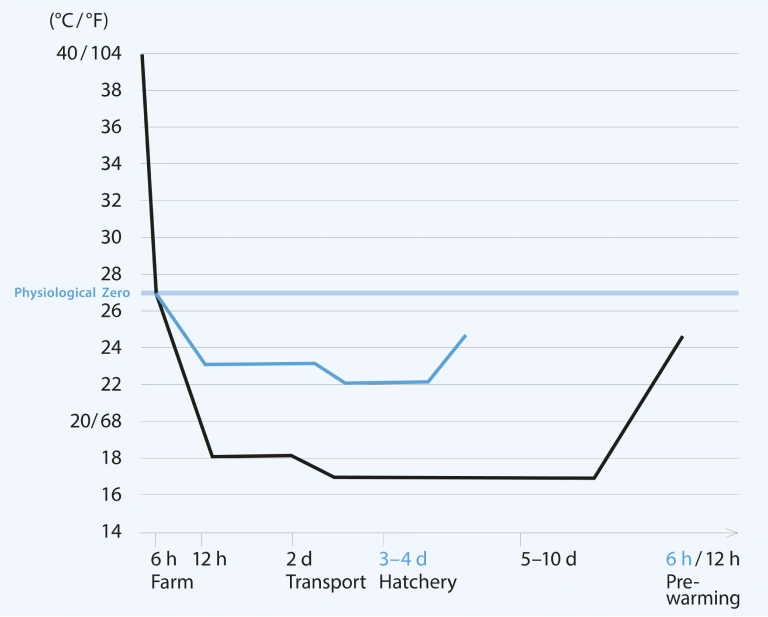
Firstly, the development of the embryo that started in the hen’s body has to be stopped. Therefore the egg should slowly cool down below “physiological zero” (26–27 °C) within six hours after being laid. This process usually happens inside the nest or on the egg belt. When the ambient temperatures are high (summer) the cooling can be a problem. In practice it means that the egg collection has to be done more frequently to avoid the embryo remaining at a temperature between 27 °C and 37 °C for too long a time. This temperature range causes an unbalanced development and hence early embryonic mortality. The hatchery staff recognises the early dead during candling as clear eggs. These are often misleadingly classified as infertile.
Also a too quick cooling of the eggs can cause embryonic mortality. Once the cell division is stopped the egg needs to cool down further. This is necessary to keep the thinning of the albumen and the amount of necrotic cell deaths under control. Control means that there are different optimal egg storage temperatures depending on storage length.
For eggs that will be set within the next 4 days it is not necessary to keep them at a temperature below 20 °C, 21–22 °C is regarded as optimal. This relatively high temperature promotes the thinning of the albumen, which improves the gas exchange during early incubation. On the other hand it is low enough to maintain the vitality of the embryo. In most layer hatcheries it is common practise to store the eggs up to 10 days. For this storage length the recommended temperature is 16–18 °C. To avoid temperature-Ws (ups and downs) when moving the eggs from the farm to the hatchery the truck temperature should be set equal to the farm egg room temperature.
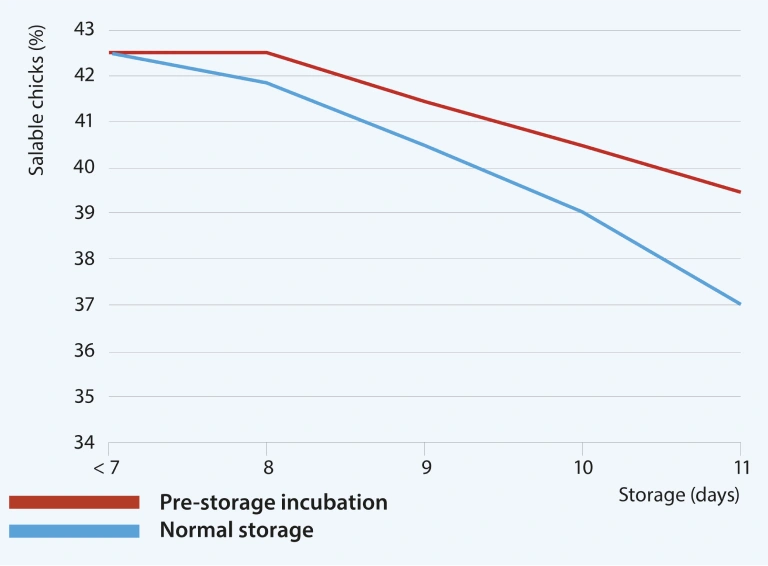
To preserve the hatchability during long storage it is better to turn the eggs. If there is no automatic equipment installed, turning by hand three times each day is sufficient. Additionally it is possible to pre-incubate the eggs before storage to improve the vitality of the embryo. If the eggs are stored on cardboard trays it is beneficial to store the eggs upside down with the pointed end up. Be careful not to transport the eggs like this, because it can cause loose air cells. Beyond one week of storage, even under optimal conditions, the hatchability will drop 0.5–1.5 % per day with the percentage increasing as storage extends further. After two weeks of storage, the chick quality will also be impaired.
Nick Chick / Super Nick are more negatively affected by long storage than Brown Nick. When using Silver Nick there is a minimum storage length of 3 days before the best hatching potential of the eggs is reached. There is some evidence that also eggs from young Brown Nick and Nick Chick / Super Nick flocks benefit from 2 to 3 days storage before being set. Please check under the condition of your operation.
The humidity during storage is not as important as the temperature. If eggs are just stored up to 10 days, 50–60 % relative humidity is sufficient. Of course it does no harm if the humidity is higher as long as it is below 80 %. Under conditions of more than 80 % relative humidity the growth and spread of fungi is facilitated and should therefore be avoided. However, when eggs are scheduled for long storage a higher humidity will help to avoid excessive moisture loss of the eggs. The target value should be 70–80 % relative humidity.
Pre-storage incubation
A hen needs approximately 24 hours to produce an egg. Around 30 minutes after an egg is laid the next follicle is ovulated. The follicle falls into the infundibulum where the fertilisation takes place. After that the albumen is added, the egg membranes are formed and the egg shell is composed.
Therefore the eggs arriving at the hatchery are containing an embryo representing already 23.5 hours development in the hen’s body. However this developmental stage at point of lay is not optimal for long storage. In nature it would be altered by periodical warming of the eggs during the time the hen sits on the nest to produce the next egg of the clutch. In the hatchery it is possible to achieve similar results by incubating the eggs for 6 hours (egg temperature 100 °F) before storage. This leads to further development of the germinal disk to a stage containing 60000–80000 cells. At this stage the embryo is less susceptible to cell death occurring during the storage period.
If the heat-up time of the incubator is longer than 6 hours, the time the eggs are kept on 100 °F should be gradually reduced from 6 hours down to 3 hours for a heat-up time of 12 hours. If the incubator needs more than 12 hours the amount of eggs set for pre-storage incubation should be reduced.
Disinfecting hatching eggs
Hatching eggs need to be disinfected, as micro organisms multiply rapidly in the warm and humid climate of a hatchery. A widely used method is fumigation with formalin.
However this is no longer recommended as it is harmful to the embryo, increasing early embryonic death, and it is hazardous to human health. Especially Nick Chick / Super Nick is susceptible to formalin.
When using formalin keep in mind:
- Never fumigate with Formaldehyde within the first 96 hours of incubation!
- Never exceed a fumigation time of 30 minutes! Room temperature should be 2025 °C, relative humidity 65–75 %.
- Re-ventilation of a fumigation chamber has to be done with clean air (not too cold) to avoid the re-contamination of the hatching eggs! Make sure that the equipment has a capacity to re-ventilate the fumigation chamber within a few minutes.
There are modern chemicals available based on glutaraldehyde and different quaternary ammonia compounds, on stabilised hydrogen peroxide and peracetic acid or just H2O2 that have the same effectiveness. These agents can be sprayed, fogged or vaporised. The most popular method is fogging as it is safe, the fog reaches all the eggs and the eggs do not get wet.
Vaporisation requires less investment in equipment, but chemicals that can be used in a safe manner are not available everywhere.
Before choosing any chemical please make sure that it is labelled for the use in hatcheries and for the desired mode of application. Eggs can be disinfected on the breeder farm, in the hatchery or both. We recommend to do the disinfection in the hatchery either after egg traying or before egg setting.
If required, a first disinfection can be done shortly after egg collection. Disinfecting the eggs on the breeder farm reduces the microbiological load as soon as possible, but keep in mind that this can not exclude the risk that floor eggs or dirty eggs may have been already contaminated. In fact what we do is not an egg, but an egg shell disinfection!
Do the basics right
- Hatching eggs are living organisms. Handle them with care!
- Grade eggs at the farm. Do not send dirty eggs to the hatchery. Floor eggs are no hatching eggs.
- Do not try to “clean” eggs by using sandpaper or an iron sponge. This will destroy the cuticle and ease the entrance of microorganism.
- Check temperature at the farm, during transport and in the hatchery. Aim for a steady decline and stable temperature. There should be no ups and downs. Check not only air temperature, but also egg temperature with an infrared thermometer.
- Eggs intended to be placed on paper trays and palettes need to be cooled down before. Place them soon after arrival to the hatchery on setter trays. This facilitates a more even temperature.
- To achieve an even temperature allow a good air flow in the storage rooms. Don’t store the eggs directly on the floor, next to the wall or too tight together. Mind direct sunlight entering the room. No water should drop on the eggs from airconditioner or humidifier units.
- Avoid using formaldehyde for disinfecting hatching eggs.
- Especially after long transport to the hatchery, the eggs need to have a 24 hours rest before setting.