The hatching cycle
In the hatcher the eggs will stay for three days. During this time the embryo will develop into a chick. After 19 days of incubation it will penetrate the inner shell membrane and lung respiration will start. The additional available oxygen enables the chick to break through the shell and hatch.
Naturally not all the chicks will hatch at the same time. The time frame during which 99 % of the chicks hatch is called “spread of hatch” or “hatch window”. Even under good conditions it can’t be much shorter than 24 hours. The spread is caused by natural variation in egg quality, egg weight and by varying conditions during egg handling and incubation. The latter especially can cause a hatch window as wide as 2 days or more.
By this, chick quality will greatly suffer, because the first hatching chicks will have to wait a long time in the hatcher, before they are pulled, processed, transported and finally get access to feed and water.
The hatch window can be easily monitored by taking out three hatcher baskets at several times during the hatching cycle and counting the number of chicks that hatched so far. 36 hours before pull there should be a maximum 1 % and 24 hours not more than 25 %. Twelve hours before take-off one should aim for approximately 75 % hatched chicks and six hours later for 99 %.
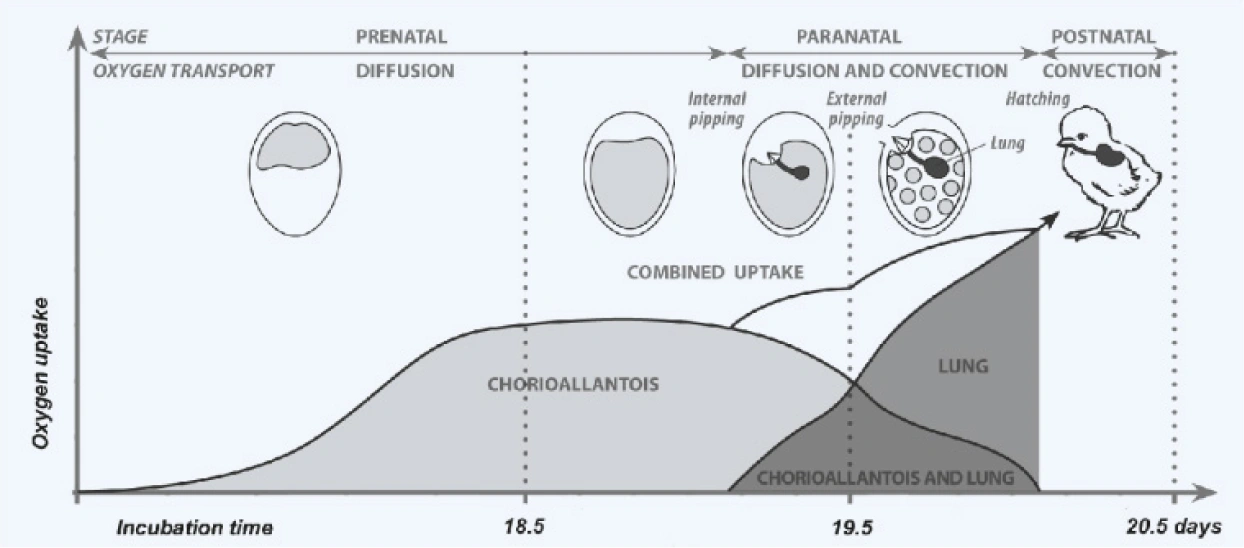
Adapted from Rahn, Ar, Paganelli (1979)
Then there is still enough time for the last chicks to dry before they are pulled.
Collecting this information and analysing it helps to find the correct setting time according to egg and flock age. If early or late hatching occurs, one should also keep an eye on the incubation conditions. Are the machines properly calibrated, are they evenly filled, is the temperature of the incoming air on target, is the spraying nozzle working properly and not too often, is the ventilation correct, did any delays occur during transfer, has the temperature been lowered too early in the hatcher …?
Monitoring chick yield
Monitoring the weight of the chicks, and their relationship with the weight of the eggs they came from (chick yield) is another hatchery management tool to control the incubation success and find the optimal setting time for the eggs. It is best done using the trays where egg weight loss has already been monitored. The technique involves counting and then weighing in bulk the Grade-A chicks from a hatcher basket in order to calculate the average chick weight and then the chick yield. Chick yield is the average chick weight divided by the average initial egg weight multiplied by 100. An ideal target for best chick quality is a chick yield of 66 – 67 %.
If the egg weight loss during incubation has been correct, but the chick yield is lower than 65 %, then incubation duration is too long. It needs to be adjusted by setting eggs later or by pulling chicks earlier. Every 1% loss in chick yield is equivalent to about four hours extra under optimal condition in the hatcher.
Hatcher operation
It is beyond the scope of this guide to provide you with a detailed program for your hatcher. As the design of the machines differ, always seek the advice of your manufacturer and specify what kind of bird you are hatching. Please consider this chapter as additional information that can help to fine tune the conditions to the needs of the hatching chicks.
Temperature, humidity and ventilation set points are in most hatcheries changed according to time during the hatching cycle. It is either done automatically by a hatcher program or manually. This works and has been proven over many years in commercial practise. However it will never fully optimise the process, as no two batches of eggs are exactly the same and will thus not show the same hatching time.
For this reason many incubator manufacturers strive to enable modern hatchers to monitor CO2 and humidity changes and based on this detect the status of the hatch.
Much more simple, and probably more cost efficient for small and medium size hatcheries, is to open the hatcher one or two times, have a look at the chicks and change the setpoints, if necessary. Beside the number of chicks hatched so far one should pay attention to the behaviour. If the condition are alright, the chicks are quiet and evenly spread in the baskets. Of course once the door is opened, or light is switched on the chicks will start to move towards the light.
If the chicks are noisy and/or move towards the pulsator (area with high air speed, cool air) and put their beaks out of the basket, the temperature is too high. If they start panting, it is far too high. If they huddle together in a corner of the basket, it is too cold. In that situation you would later also find many pipped eggs in the baskets at chick take-off.
If you notice lethargic heavily breathing chicks, the CO2-level in the cabinet is too high. This is caused by a low ventilation rate of the hatcher itself or of the hatcher room. Whereas the CO2 concentration in the room should be close to the one of fresh air (0.036 %), it is normal that the concentration in the cabinets during hatch rises to 0.5–0.6 % sometimes up to 0.8 %. Higher values should be avoided as they might compromise chick quality.
In addition to temperature and ventilation, the humidity is also important for a successful hatch. The following general guidelines for the hatcher operation includes all three variables:
- Keeping the damper closed to 15 % and increasing the temperature by 0.2 °F helps to quickly bring the eggs back to incubation temperature after transfer. After six hours one should return to the normal settings, which depend on the incubator model. The humidity is usually kept at 84 °F wet bulb, respectively 55 % RH during this stage. Keep in mind that setpoints might need to be adapted, if you do the transfer earlier or later than usual. The CO2 level is 0.3 – 0.4%.
- Once the chicks start to hatch you will notice a natural increase of humidity. There is no demand for humidification at this point. If you notice no rise in humidity, check if you need to reduce the ventilation rate. As the ventilation is kept relatively tight to promote the humidity build up, also the CO2 level might rise up to 0.7–0.8 %. The temperature can be lowered by 0.2 °F.
- When half of the chicks are hatched the humidity should be approximately 92 °F / 75 %. If it is lower, humidification is required to keep it at the target level. The high humidity helps to achieve an even temperature, slows down the drying process of the chicks and supports the late hatching chicks by keeping the shell membranes soft. The temperature can be lowered by 0.2 °F. Do not lower the temperature if the hatch is not on time!
- When all the chicks are hatched one should aim to create optimal conditions for the chicks to wait in the hatcher until pulled. The humidity setpoint can be reduced to 85 °F / 60 %, the ventilation opened to decrease the CO2 level below 0.4 % and finally the temperature should be set according to the optimal body temperature of the chicks (see next chapter).
- The chicks are ready to be pulled when they are dry, some still showing slightly wet feathers in the neck. The legs of the chicks should feel smooth. They will feel rough when the chicks start to dehydrate.
Do the basics right
- Control the hatcher temperature and humidity by using a mercury door thermometer or a good electronic device.
- Do not fully rely on electronics! Watch the chicks one or two times during the hatching cycle to judge the conditions. Do not be afraid to open the doors. The chicks should be evenly spread and quiet.
- Even though the humidity is rising during hatch, the cabinet walls and the floor should be kept mostly dry. A wet floor in combination with chick fluff is an ideal breeding ground for germs. Avoid too cold cooling water, which causes excessive condensation on the coils.
- Check the chicks in the morning on hatch day to schedule the sequence of chick pull. If the chicks in general are too dry or too fresh, search for possible mistakes during incubation. If everything was alright, rearrange the setting times.